
Configuring autologon in Windows 10 and on Windows 11 offers several benefits that can help you make the system easier to use.
di Antonio Lamorgese
Setting up autologon in Windows 10 and on Windows 11 offers several benefits that can help you make the operating system easier to use. This feature allows you to log into the system quickly without having to type your password every time. In addition, it can also offer you more security, as it can allow you to limit system access to authorized users. Now we will quickly see what these advantages are and if it is convenient for you to enable this type of option on your operating system.
The advantages of setting up autologon in Windows
Convenience: The main reason most people set up automatic login is for convenience. This means you no longer need to type your password every time you log into Windows. Also, setting up the automatic login is quite easy to do, which means that even novice users can easily set it up. Once set up, your system will automatically start up after a short period of inactivity, meaning you don’t have to type in your password every time you need to restart your computer.
Security: While setting up automatic login offers the convenience of not having to type your password every time, it can also increase security. This is especially true if you are using low-privilege accounts. This means that only the authorized user can access the system. In addition, the automatic login setting can also prevent other unauthorized users from accessing your computer. This helps prevent unauthorized access to your personal data.
Protection: Another benefit of autologon in Windows is that it provides an extra layer of security. This means that in the event that a user loses his password, the operating system will not be accessible until it is reset. This means that even if an unauthorized user were able to gain access to the system, they would not be able to use it for their own benefit.
Ease of Use: Another big advantage of using automatic login on Windows is ease of use. Once set up, the user can access the system quickly and efficiently. There is no need to remember the password every time, which means that the user can save time and effort. In addition, you can also set up your login profile to allow automatic login to any authorized user.
So, if you’re looking to set up your Windows 10 or 11 operating system to log you into your account automatically, you’ve come to the right place. In this article, I’ll show you how to set up automatic login on Windows 10 and Windows 11 in a few simple steps.
Read more: “How to activate Windows 10 for free”
1. Access the Windows settings
Now, to set up automatic login you must first open the Windows settings. To do this, you can simultaneously press the Windows + I keyson the keyboard. After pressing these keys, the Windows settings window will appear on your computer screen. Here you can find all settings for Windows.
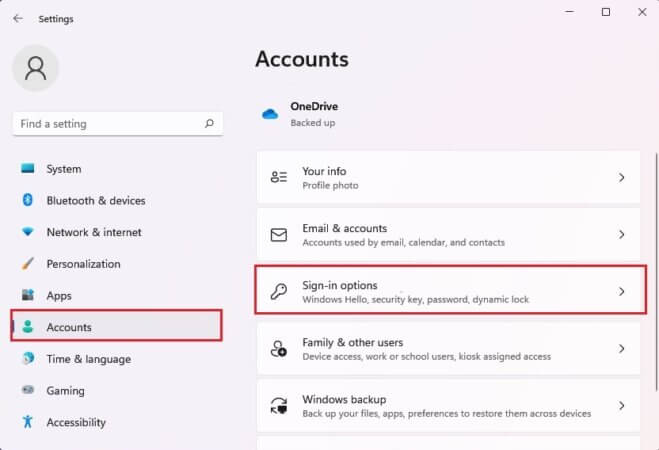
2. Select the Accounts option
After opening the Windows settings, you have to select the “ Account ” option. Once you select this option, you will be shown a list of items through which you can manage all your accounts. Here you can find options such as adding a new account, editing an existing account and much more.
3. Select the Automatic Login option
After selecting the Account option, you need to select the “ Sign-in options ” item. Once you select this option, you will see a screen with other items to enable to configure automatic login on Windows. So, you are in the right section to be able to choose to enable or disable automatic login.
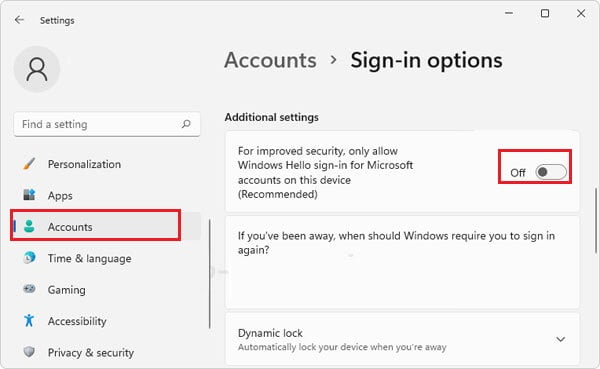
4. Enable Automatic Login
If you want to enable automatic login, in the section “ Additional settings ” you must make sure that the option “ Disabled ” is selected and then click on “ Save ”. Once you enable automatic login, your account will be automatically logged in when you turn on your computer.
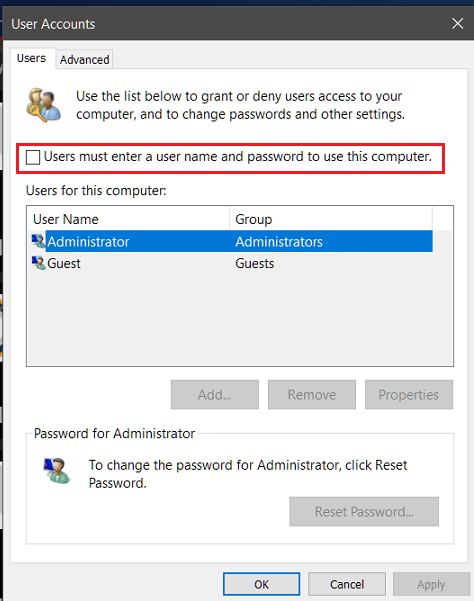
this is done, you must execute the “ netplwiz ” command by clicking the Windows + R buttons simultaneously, type the “ netplwiz ” command, without quotes, and then press the ENTER key. At this point a window will open where you will find all the access accounts to the computer. Now, you have to select the account on which to activate automatic access and remove the check mark next to the item ” User must enter a username e password to use this computer “. Click the “ Apply ” button and Windows will no longer ask you to enter a username and password on startup.
5. How to disable automatic login
After activating the ” Automatic login windows ” feature you may want to deactivate it as it is impractical for you or of little use. In this case, you just have to go through the process in reverse and activate everything that you previously deactivated. Once the automatic login is disabled, the user will have to manually enter the login credentials each time the computer is turned on.
Read more: “ChatGPT in action with CURL from command prompt”
Conclusion
Automatic login on Windows is a function that allows you to automatically log into the operating system without having to type your username and password each time. This means that, once the automatic login is set, the computer will automatically log into the specified account at startup, without requiring further interaction from the user. This feature is useful for people who want faster access to their computer, or for computers that are used by one person and don’t require stringent security protection. However, it is important to pay attention to system security when using this feature, as it could be a risk to data security if your computer is stolen or used by an unauthorized user.