Speed up a wordpress site is the main practice to put in place before even writing content. In this guide, I'll reveal the trick used by web professionals.
di Antonio Lamorgese
I have been in the SEO field for some time and one thing that certainly inspires fear is when you have to speed up a WordPress site or optimize its loading following a request, for example from Google, to optimize the LCP factor. Well, I’m sure you are wondering, “Oh my God what does the LCP factor represent and why is it so important to Google?” In reality, Google is keen to have all content indexed on its search engine with the lowest possible LCP. This is because the lower this value the faster your web pages load and the more feedback and traffic they will receive. All to the benefit of both you and Google.
In fact, LCP is the acronym for “Largest Contentful Paint“. And it expresses the loading time of a web page. Google, and in any case every search engine, regularly scans all the web pages, indexed within it, constantly checking this value. In the event that the LCP exceeds the value of 2.5, it informs the copywriter or webmaster, via the Google Search Console, to speed up his website to attract as much traffic as possible.
I can assure you that receiving an email from Google specifically asked me to speed up my website by improving the LCP factor, too. At first glance, reading such an email can certainly be frustrating, also because improving this value is not absolutely simple, but it is by no means impossible. In this guide, we will look at a very underestimated tactic by almost all copywriters, especially novices, to speed up a website and that can be implemented immediately with minimal effort.
If you run a blog or website, chances are you want to get more traffic. Well this is completely normal if you want people to find your content and like what you write. Your authority on the net depends on this. Of course, Google also plays a very important part in achieving this goal. Therefore, if you want it to index your website faster and to appear on the first pages of search results, you must absolutely know this trick, also used by professionals, which will allow you to improve the LCP factor immediately.
Have you ever heard of CDNs? Most likely yes, but I’m sure no one has ever explained to you in detail how to use it. In the next paragraph I will explain what a CDN is and how it can speed up your website instantly.
Read more: The best 10 Android emulators for PC and Mac
1. What is a CDN
CDN stands for “Content Delivery Network”. Represents a set of servers, located as close as possible, geographically, to the user who requested to view a specific web page or resource, and which can store a snapshot of your website in their cache memory. This means your web content can be downloaded faster.
There are many online, but some are paid, others have a free plan. One of them is Quic.Cloud. This CDN has the advantage of being integrated into WordPress, for free, using the LiteSpeed Cache plugin. But you can use it with any website and any CMS you decide to work with and develop your blog with.
Read more: How to fix Windows 10 in 5 different ways
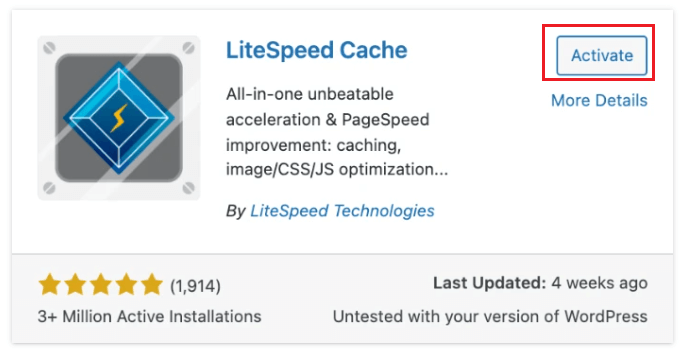
2. Download the LiteSpeed cache plugin
Well, the first step is to log into the WordPress dashboard and install the LiteSpeed Cache plugin. This plugin, in addition to optimally managing the cache of your blog, speeding up the opening of your web pages, has the enormous advantage of integrating, for free, with Quic.cloud and significantly speeding up the loading of your posts. The installation and subsequent activation of the LiteSpeed Cache plugin follow the normal activation procedures of any WordPress plugin. Therefore, all you have to do is search for it and activate it when requested.
2.1 Setting up LiteSpeed Cache
For a correct setting of this plugin I suggest you to access this link and to follow step-by-step all the settings suggested by an expert. The procedure is very simple and will take you to set up LiteSpeed Cache in a matter of minutes. After this setting, your blog will already be speeded up, but the integration of LiteSpeed Cache with Quic.cloud will give your blog the features that only established webmasters can achieve after years of sacrifice and study.
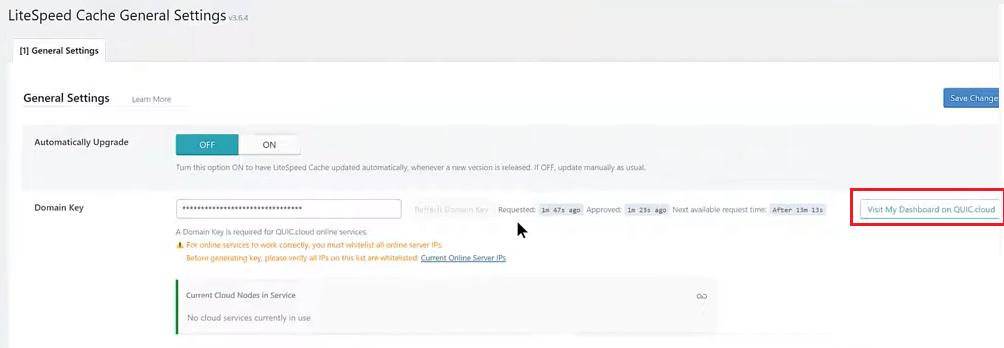
3. Request a valid domain key from Quic.cloud
After installing LiteSpeed Cache you absolutely need to request a valid domain key, from Quic.cloud, for your blog. In this regard, go to the LiteSpeed “General Settings” tab and click on the green “Request domain key” button.
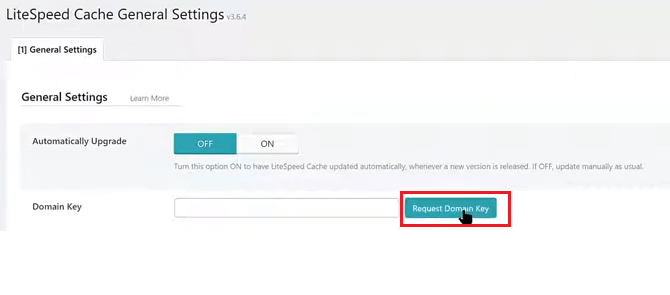
Litespeed will notify Quic.cloud of its intention to interface your blog with its cache management system. After a few seconds Quic.cloud will send the domain key to LiteSpeed.
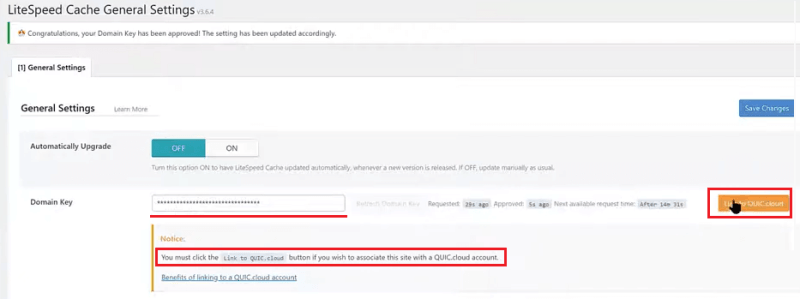
4. Link WordPress to Quic.cloud
Immediately after receiving the key you will need to connect your wordpress site with Quic.cloud. To do this you have to click on the orange button “Link to Quic.cloud“, always present in the “General Settings” tab of LiteSpeed.
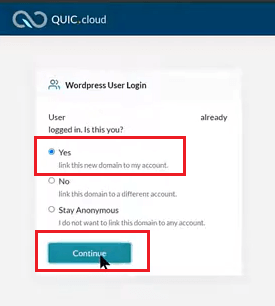
5. Log in Quic.cloud with your WordPress account
After requesting to connect LiteSpeed to Quic.cloud the plugin will redirect you to the login page of the Quic.cloud portal. Here you will have various possibilities of authenticity. I recommend that you leave the check mark on “Yes” to connect your domain with your WordPress account. Now, click on the green “Continue” button and your domain will have already been added to your account on Quic.cloud.
6. Enable Quic.cloud in WordPress
Well at this point you need to enable Quic.cloud within LiteSpeed Cache. To do this, click on CDN, item in the LiteSpeed menu, and from the “CDN Settings” tab, click on the “ON” button under “Quic.cloud CDN“. Click on the “Save Changes” button and Quic.cloud will be active in LiteSpeed Cache.

Now, click on the green button “Visit your dashboard on Quic.cloud”, always present in the “General Settings” tab of LiteSpeed and you will be inside the Quic.cloud dashboard.
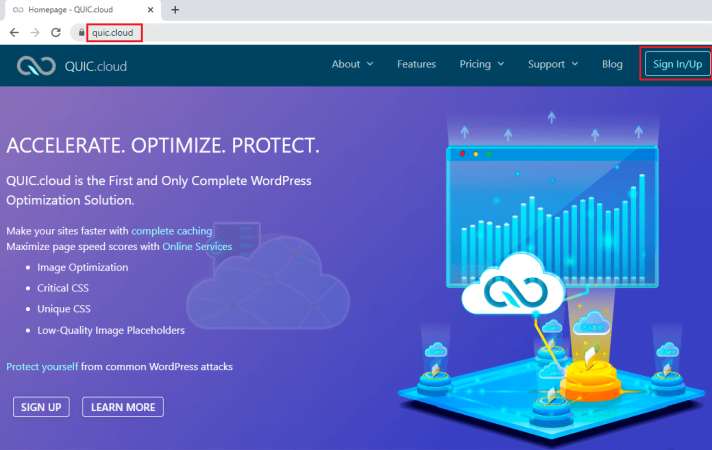
7. Log in to the Quic.cloud portal
At this point there are some settings to be made within Quic.cloud. These settings must be made directly from the portal dashboard. Then you need to log into Quic.cloud. You can access Quic.cloud by clicking on this link and, if you have Gmail credentials, you can click on the “Sign In/Up” link and then click on the button with the Google logo. Alternatively, you can use the login credentials to your WordPress site.
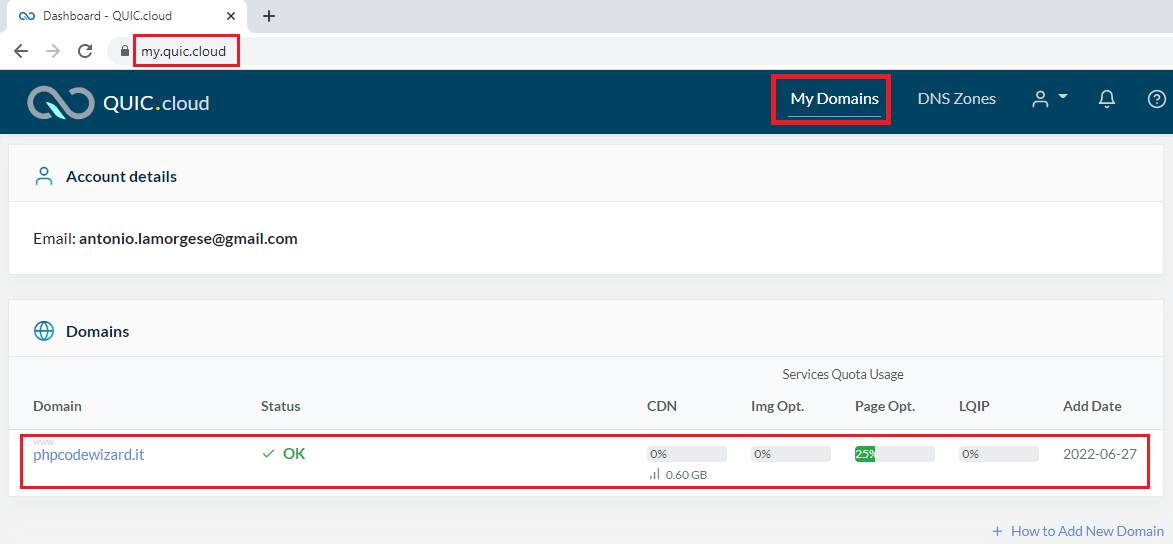
8. Quic.cloud setup begins
Immediately after logging into Quic.cloud you will find yourself in the “My Domains” tab where you will already be shown your connected domain. This is the result of what you have done previously with LiteSpeed Cache.
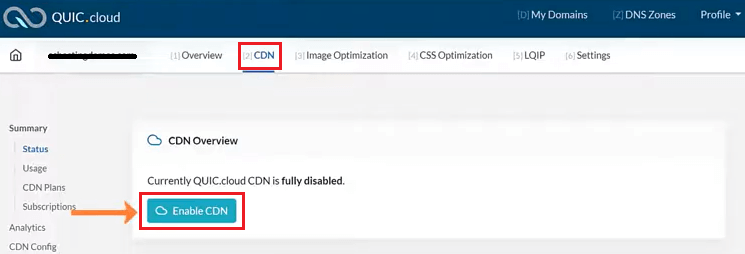
9. Enable CDN in Quic.cloud
Now, you need to enable the CDN from the Quic.cloud portal as well. the operation is very simple, just click on the link for your domain and then on the “CDN” item in the top menu. Now, you need to click on the green “Enable CDN” button.
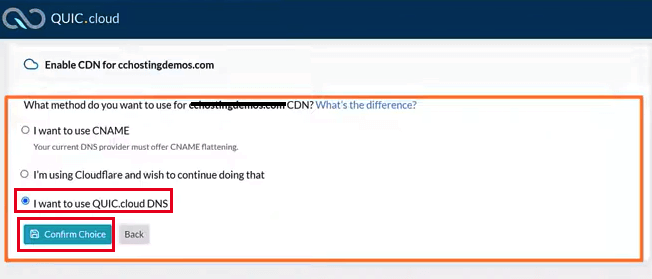
10. Confirm the use of Quic.cloud DNS
Quic.cloud will ask you to select the method you want to use to take full advantage of the DNS that the service has associated with your domain. Yes, here I have to make a clarification. Usually, when you buy domain and web space, your provider associates you with DNS that have been associated with you and that the web server will make available to trace your URLs within the vast world of the network. Now, you need to use Quic.cloud’s DNS and not your provider’s to speed up your website and publish your resources on CDN managed by Quic.cloud.
Then, select the item “I Want to use Quic.cloud DNS” and proceed by clicking on the “Confirm Choice” button.
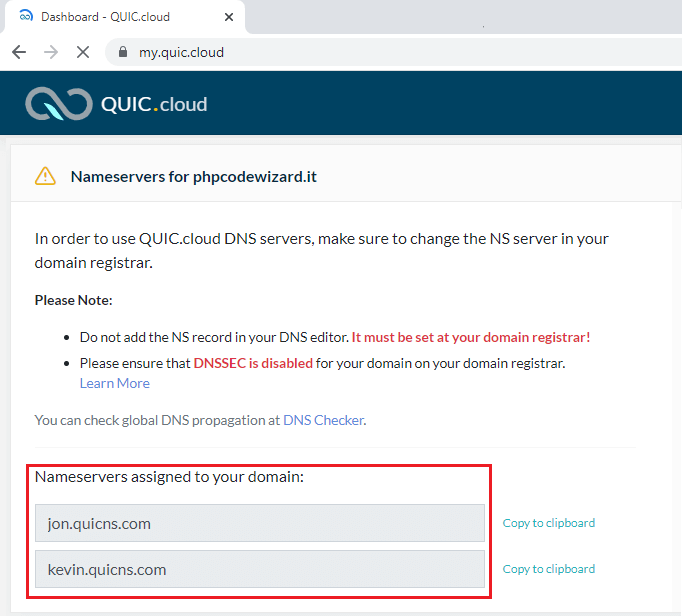
11. Copy the DNS that Quic.cloud has assigned to you
As I told you earlier, Quic.cloud has associated two DNS servers with your domain. Make a note of these two web addresses and log into your provider’s control panel.
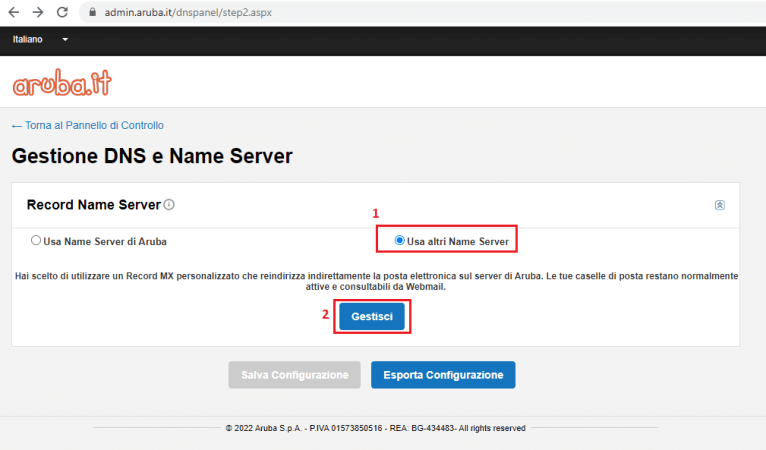
12. Log in to the Aruba dashboard
Since my blog is hosted on an ARUBA provider, I will show you the procedure that Aruba offers to change the DNS to associate with my domain. The procedure is the same for any other type of web service provider. In any case, once logged into the Aruba control panel, click on the “Domain” item and then on the “DNS and Name Server Management” item. At this point select the item “Use other Name Servers” and click on the “Manage” button.
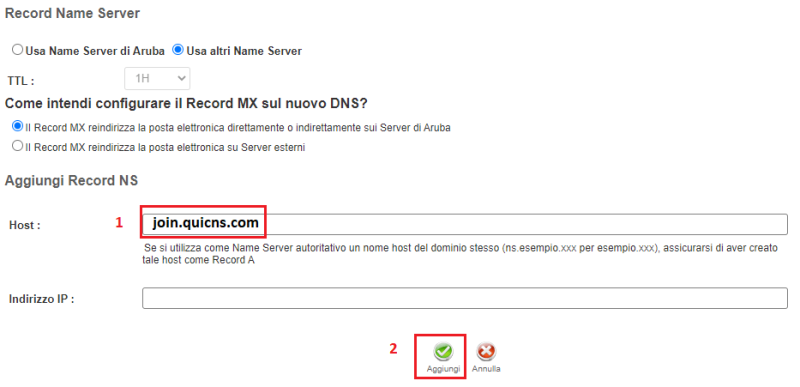
13. Enter the two assigned DNS
In the text box located under “Host” paste the URL of the first Name Server copied with the procedure described in the paragraph above. Click on the “Add” button and the first Name Server has been successfully associated with your domain.
In the same way, always paste the second Name Server in the “Host” text box, copied with the procedure described in the previous paragraph, and click on the “Add” button.
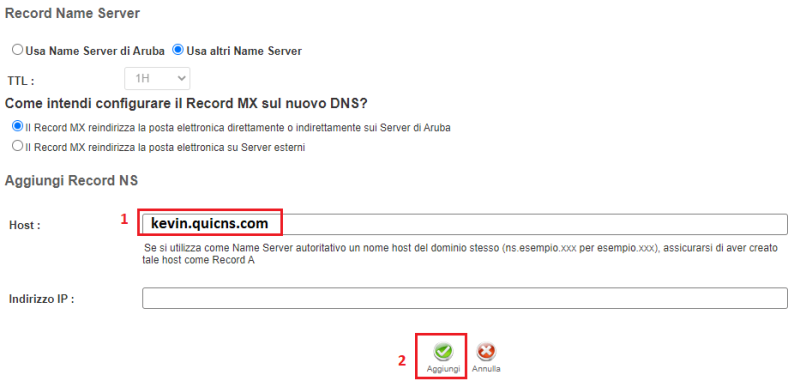
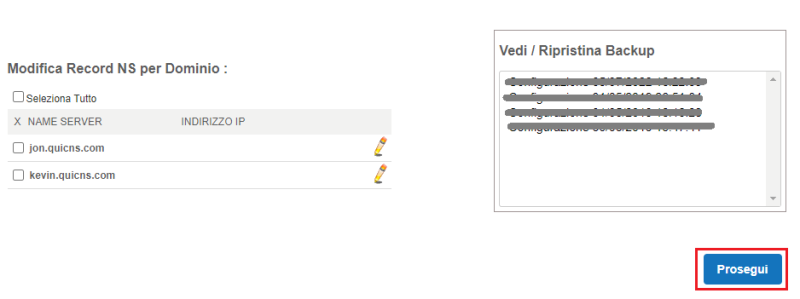
After entering the two Name Servers, provided by Quic.cloud, click on the “Proceed” button at the bottom of the Aruba DNS management page and the Quic.cloud configuration in Aruba can be considered completed.
14. Finish configuring Quic.cloud
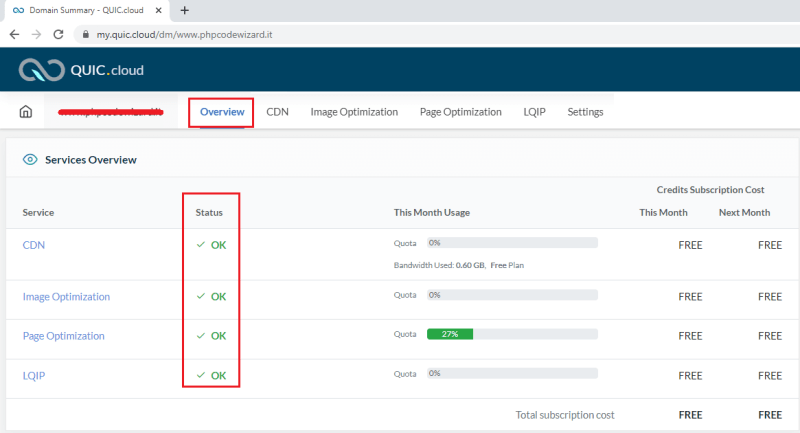
The time has come to understand if all these steps related to the configuration of LiteSpeed and Quic.cloud have given the desired results. Then, go back to the Quic.cloud portal and click on the “Overview” link. If all went well in the “Status” column you should see “Ok” on all four services offered by Quic.cloud.
From this moment on, as users visit your posts, Quic.cloud servers will make available all the resources contained within each of your web pages published on servers as close, geographically, to the user as possible. is requesting access. This will greatly speed up access to your web pages. At this point, through GTmetrix, you can perform an analysis of the performance of your web pages and understand how essential it is to use a CDN to speed up your website.
Since we talked about WordPress, I want to share this video tutorial to make you understand how important it is to configure WordPress with the right plugins and, how harmful it is, to install numerous plugins.

Read more: How to reset the Windows 10 password