
How Create Your Own Programming Language
Many programmers or, programming enthusiasts, during their professional career, find themselves having to use various programming languages. It is often to exploit techniques and algorithms, sometimes even very sophisticated, for the resolution of problems that gradually arise. During this process, many of them ask themselves this question: “How to create your own programming language?“, Or, “What is hidden behind a command of any language?“.
Before answering this question, we will try to understand how many types of programming languages exist.
Today, we have two types of languages, there are compiled languages and interpreted languages. The difference is substantial, in compiled languages, the source code, that is our program, is converted into an executable file directly from the machine without the aid of any intermediate translation software. In interpreted languages, on the other hand, our source is not converted into an executable file but translated command by command and executed from time to time by an intermediate program called interpreter.
In summary, we can say that compiled languages are converted by a software called a compiler, while the commands of an interpreted language are executed directly by a software called an interpreter.
In this article I will explain how to create a programming language, specifically an interpreter, as it is “simpler and more immediate” than the design of a compiler, which would require not only a thorough knowledge of some very sophisticated tools, which we will see, but also a advanced knowledge of the type of processor that will have to execute the code.
But what will you be able to do after reading this article? Well, you will understand the use of a Lexer and a Parser, how to program them up to designing your own command shell and creating one of the essential commands for any language: “the Print command”. In short, you will discover how to create commands, pass parameters to them and execute them within the command shell, which you will design and customize to your liking. Not only that, but you will also see how to execute these commands by saving them in a script and creating your own interpreter.
Table of contents...
Required software
Like any self-respecting project, we need to download what is necessary, that is, to set up our toolbox, in order to configure the design environment essential for this purpose. The tools we will use are all open source, that is, they can be downloaded and used for free. All the software we will use are available for the most popular Operating Systems, therefore what we will see in this article is not oriented to a specific operating system but is applicable to both Windows and Linux systems.
Text editor
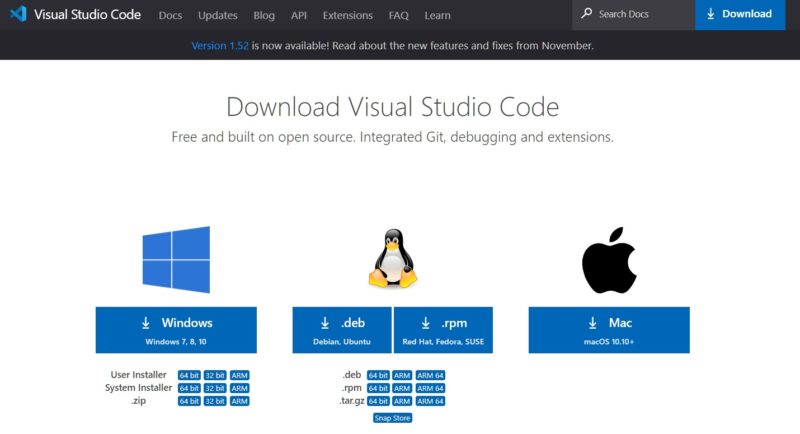
Since we will need to edit text files, we necessarily need a text editor. Among the many available on the net, I recommend Visual studio Code, Microsoft’s free editor with excellent features, ideal for any language and software project.
To download Visual Studio Code go to this link where you can choose the package for the OS. desired and proceed with the installation, as shown in the figure:
This editor does not need, for our needs, configuration or customization but, here you will find an explanatory video of the Visual Studio Code download and installation process.
C language compiler
Another necessary tool is a C language compiler, we will use MinGW, MinGW is the Windows porting of the famous GCC compiler for Linux.
Only and only if you use Windows, you have to download the C MinGW compiler from this link, for Linux there is no need, we will install it with a simple command from the terminal, as we will see later.
Subsequently, always and only in Windows, extract, copy and paste the mingw folder in C :, update the PATH system variable by entering c: \ mingw \ bin. If you have problems setting the “PATH” environment variable in Windows, click here.
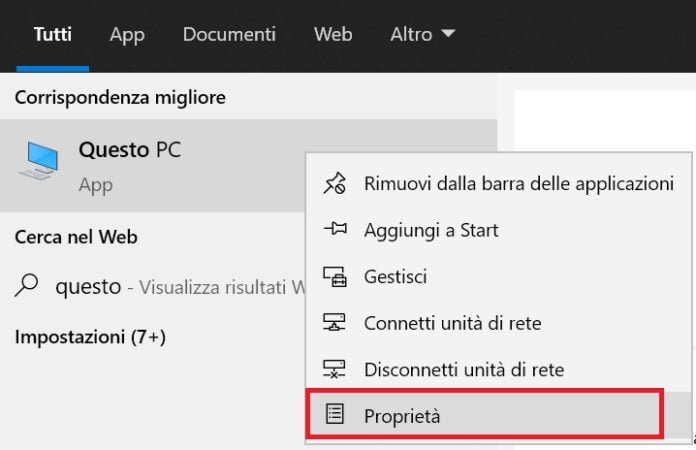
However if you follow these simple steps you will do this in a second. First click with the right mouse button on the item “This PC” and then on “properties”, as shown in the figure:
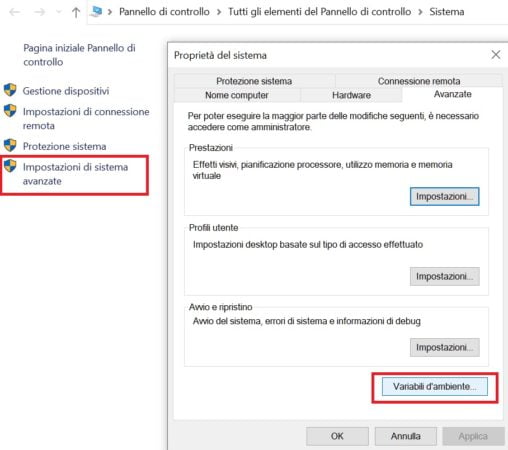
Click on “Advanced system settings” and then on “environment variables”, as shown in the figure:
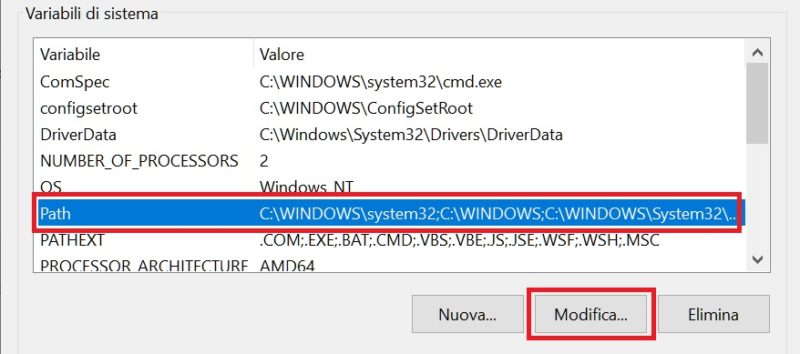
Select, in the lower box relating to system variables, the line that highlights the content of the variable path, and then click on edit, as shown in the figure:
Click on the “New” button, enter the following path: c: \ mingw \ bin, and then on “Ok”, as shown in the figure:
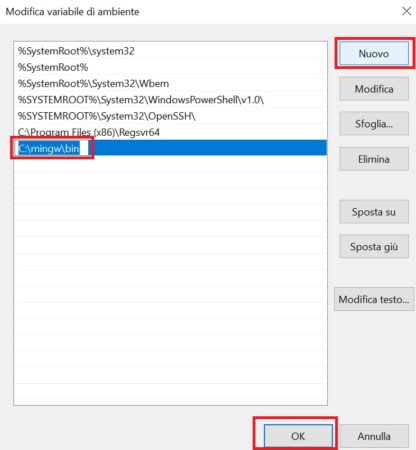
Restart the computer for the changes made to the Path system variable to take effect.
As for the installation of the C compiler in Linux, things are slightly simpler, this means that it all boils down to issuing the following command from the terminal: sudo apt-get install gcc.
Install the Parser
Now the time has come to install a software that will play an active part, together with the next one we will install, let’s talk about Bison. Basically Bison is a software that analyzes a data flow, received from the command shell or from a script, in order to recognize the grammar of a command or a construct of a programming language.
Through Bison, we will generate the parser for our interpreter. Later we will see in detail how it works, now let’s just install it.
If you have a Windows system, you do not need to install anything, as Bison has already been integrated, by me, in the package you downloaded in the previous point. But if you have a Linux distribution, as happened with the C compiler, all we have to do is type the following command from the terminal: sudo apt-get install bison
Read more: How to install windows 10 on raspberry Pi. 4 and Pi 3
Install the lexical analyzer
Earlier I talked about Bison as the active part together with another software, for the design of an interpreter. This other software is Flex, Flex is a lexical analyzer, that is a scanner generator, able to analyze a data stream, received from the command shell or from a script, in order to recognize keywords, symbols and so on. , and perform a certain action every time it encounters a certain combination of characters, called TOKEN.
Quiet, nothing complex but, as I said for Bison, now let’s just worry about installing Flex and later you will also understand how it works.
So, if you have a Windows system you don’t need to install anything, as Flex has already been integrated, by me, in the package you just downloaded previously. But if you have a Linux distribution, as was the case with the C and Bison compiler, all we have to do is type the following command from the terminal: sudo apt-get install flex
Verification of correct software installation
Our toolbox is ready but, we must verify that everything that has just been done is working and properly configured. Then, all you have to do is type the following commands from the Windows command prompt or, from the Linux terminal:
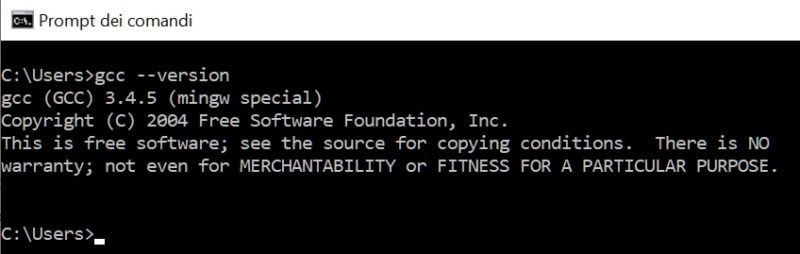
gcc –version
Press Enter, in response if you get information about the version of gcc installed, it means that the C compiler has been installed correctly, as shown in the figure:
bison –version
Press Enter, in response if you get information about the version of bison installed, it means that the Parser generator has been installed correctly, as shown in the figure:

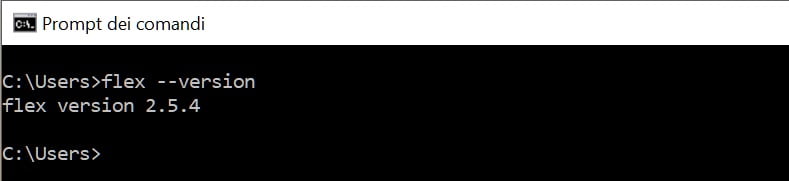
flex –version
Press Enter, in response if you get information about the flex version installed, it means that the scanner generator has been installed correctly, as shown in the figure:
Regular expressions
Now we have to consider an object, widely used by developers, which is known as a “regular expression”. Surely you have already heard of regular expressions or have used them in the past.
They are used to search and replace portions of text in strings, therefore they are widely used by all programming languages, not only that, for example, they are also used by text editors to search and replace strings in the source code.
If you are a skilled user of regular expressions, you can also skip this paragraph and move on to the next, otherwise I suggest you continue reading as this type of object, invented back in 1950 and currently still irreplaceable, represents one of the fundamental pillars programming.
However, in this article, I will not cover regular expressions as a whole, there are whole books that cover the subject but, we will only see the aspect concerning searching for strings within data streams, how it could be, for example, a text file.
So, without going into too much specifics, regular expressions will be used by Flex, that is the scanner generator, to identify the TOKENs, that is the keywords of our interpreter, within a script or source file.
It seems complex but it is not at all. When you see how Flex works, you will immediately realize the simplicity of regular expressions and their indispensable development advantage.
I recommend that you take a look at this video tutorial, it is not necessary, but you will already have an idea of what regular expressions are and how to use them.
The structure of the interpreter
Before moving on to the phase of implementing the vocabulary and grammar of our interpreter, we need to download one last software package. It concerns a file, compressed, prepared by me, and which contains the interpreter’s structure, composed of folders and files, already prepared ad hoc, to put you in a position to understand immediately, opening appropriate files that I will explain to you, how the design takes place actual interpreter.
Then, download from this link, and extract the content, that is the interpreter, in the position on the PC that you think is most appropriate, already compiled and executable. In the following paragraphs, I will explain step by step, the contents of the files and how to customize the vocabulary and grammar, appropriately programming the lexer and the parser.
At the end of the download, you will find a folder called “language”, which will contain this structure:
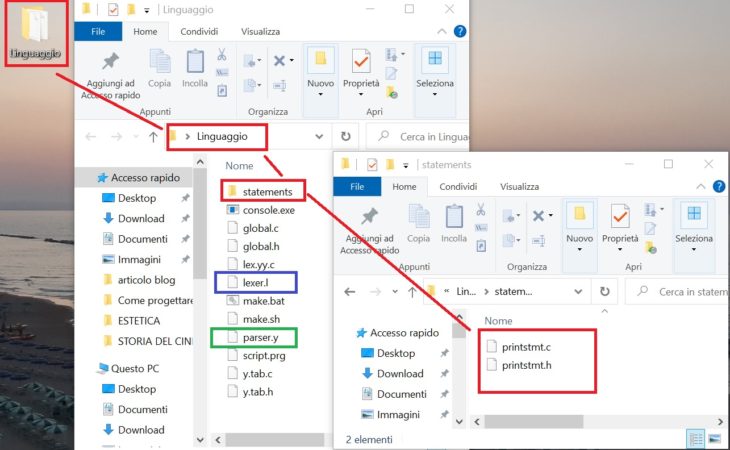
Just for the sake of completeness and, surely you have already noticed, I am using Windows 10, and I have unzipped the file lingua.zip on my desktop. I want to clarify, as I have already said previously, that everything we will do with this project in Windows 10 is also applicable to any other Linux distribution.
Implementation of the lexicon
Now Visual Studio Code comes into play. So, all you have to do is open the Microsoft editor, and click on “File” from the main menu and then on “Open Folder”, choose the “language” folder and click on “Select folder”.
The result is shown in the figure:
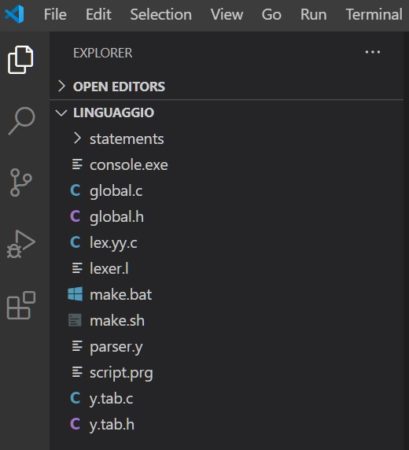
in the left frame, you will notice all the contents of the “language” folder listed, now you will have to open the file “lexer.l”, by clicking on it, which will allow us to program the scanner. This file will then be fed to Flex, who will generate the perfect scanner for our interpreter.
This file consists of four sections. In the first section, that is the one enclosed between the characters “% {” and “%}”, there are only instructions for including header files of the standard C library. In this section for the moment we will not make any changes.
In the second section, that is the one enclosed between the characters “%}” and “%%”, there are instructions that are already more interesting than the first. In fact the following code:
Number       	([0-9]+)|([0-9]+\.[0-9]+)|(\.[0-9]+)
Argument	(([-*./|a-zA-Z])|([-*./|_a-zA-Z][-*./|_a-zA-Z0-9]+))
String        	\"(([^\"]*)|([\!]*))\"
Identifier    	@?(([a-zA-Z])|([_a-zA-Z][_a-zA-Z0-9]+))
They do not need comments, it is immediately clear, reading the identifiers that, everything that follows the wording Number, represents the regular expression used by the scanner to search for a number present in the data stream received by the scanner itself, or by the our command script. Here too, and just to recall what was previously said with regular expressions, you don’t have to make any changes. This identifier returns the NUMBER token to the parser.
The same thing applies to the String identifier, whose regular expression gives indications to the scanner to search for any strings contained in the data stream, or in our command script. This identifier returns the STRING token to the parser.
The same thing applies to the Argument identifier, whose regular expression gives indications to the scanner to search for any arguments or parameters, passed to the commands that we will create, contained in the data stream, or in our command script. This identifier returns the ARGUMENT token to the parser.
The same thing applies to the identifier keyword, whose regular expression gives indications to the scanner to search for any identifiers, such as variable names or whatever, passed to the commands we will create, contained in the data flow, or in our commands. This identifier returns the IDENTIFIER token to the parser.
These lines of code:
A [aA]
B [bB]
C [cC]
D [dD]
E [eE]
…
…
make our interpreter No Case Sensitive. That is, the commands we will create, and everything we write in our command scripts, can be written in either lowercase or uppercase, and consequently the scanner will identify without problems, for example, the PRINT command, in each of these forms: PRINT which Print both pRiNt, etc …
In the third section, that is the one that contains the following instructions:
P}{R}{I}{N}{T}	{ return PRINT; }
{C}{L}{E}{A}{R}	{ return CLEAR; }
{H}{E}{L}{P}	{ return HELP; }
{Q}{U}{I}{T}	{ return QUIT; }
{E}{X}{I}{T}	{ return EXIT; }
{D}{I}{R}	{ return DIR; }
{C}{L}{S}	{ return CLS; }
"("		{ return OPENBRACKET;}
")"		{ return CLOSEBRACKET;}
","		{ return COMMA;}
here are the commands we will create, in this case the commands have already been entered: PRINT, CLEAR, HELP, QUIT, EXIT, DIR, CLS. As you can see on the right of each command the TOKEN that will be sent to the parser, that is to Bison, is specified in curly brackets, but we will see later how the parser will check the grammar of the command, executing the associated code.
In the fourth section, i.e. the one that contains the following instructions:
int main(int argc, char **argv) {
    ++argv;
    yyin = stdin;
    if ( --argc > 0 ) {
       prompt = "";
       yyin = fopen(argv[0], "r");
   } else {
      printf("%s", consoleMex);
      printf(prompt);
   }

   yyparse();
}

int yywrap(void) {
   return 0;
}

int yyerror(const char *errormsg) {
   fprintf(stderr, "%s\n", errormsg);
   exit(1);
}
it is the part of code C, which sets the scanner in motion. We are talking about that part of code that scans the data stream, through the yyparse () function, that is our command script, recognizes the TOKEN specified in the third section, and sends them to the parser. In the next paragraph we will see how, the latter recognizes the grammar of a command, and executes the associated C code.
Before moving on to the description of the parser, I want to make a clarification. The part of the code that follows the instruction: yyin = stdin; serves to execute the commands or instructions that we will create, in two different environments. That is, if when you run the interpreter, you pass a file, our command script, as an argument, then the scanner will read the script and will consider it as a data stream to be verified. if, on the other hand, when you run the interpreter, you do not pass any arguments, then the scanner will open a command shell, and everything you type from the keyboard will be checked by the scanner. Consequently, a command shell, our terminal, will be displayed with an initial message, and from there on, everything you type will be processed by the scanner and considered as an incoming data stream to be managed.
I reiterate that in this section, for the moment, you must not make any changes.
Grammar implementation
Now let’s get to the heart of the discussion, we’re about to see how a parser works. For the moment, still in the left frame, open the “parser.y” file by clicking on it. This file consists of several sections, but the most interesting is this:
commands:
         printstmt
       | dirstmt
       | helpstmt
       | quitstmt
       | clsstmt
       | clearstmt
       ;
the identifiers that follow the “commands” directive are nothing more than names associated with the grammar of each command created. For example, to the PRINT command I have associated the name print + stmt which stands for statement (statement), but you can give the name you want. So, the DIR command (list of folders and files, very well known command … that you will have used a thousand times) I have associated the name dir + stmt, etc …
Any other command must be added in this section by specifying the name that you will associate with the grammar. But we will see it in a while.
All the code following the “commands” declaration is the actual grammar itself, for example:
printstmt:
   PRINT STRING {
      printStatement($2);
      if(strlen(prompt) > 0) printf("\n");
   }
;
This code is of a disarming simplicity, but let’s see in detail what it does. First of all, the “printstmt:” declaration indicates that the following code is associated with the “printstmt” directive called up in “commands” and checked cyclically every time it is repeated within the script or typed in the command shell.
I token PRINT STING, specificano la grammatica del comando PRINT. Cioè il comando PRINT è costituito dal token PRINT + un argomento, che in questo caso è una stringa, STRING. Ad esempio, potremmo digitare qualcosa del genere: print “Hello world”.The PRINT STING tokens specify the grammar of the PRINT command. That is, the PRINT command consists of the PRINT token + an argument, which in this case is a string, STRING. For example, we could type something like this: print “Hello world”.
The code that follows the PRINT grammar, that is: printStatement ($ 2); executes the printStatement function that you will find in the “statements” subfolder located under “language”, remember?
Solo una precisazione, circa l’argomento $2, della function printStatement. Nella dichiarazione della grammatica del comando PRINT e cioè: PRINT STRING, il parser associa ad ogni TOKEN presente, un progressivo preceduto dal simbolo $. In questo caso a PRINT è associato $1 e a STRING è associato $2. Questo significa che quando viene richiamata la function printStatement, il parametro $2 conterrà la stringa passata come argomento a PRINT, e così via, per cui potremmo avere anche un $3, un $4 e così via. Parliamo di parametri, che compongono la grammatica del comando e che potrebbero contenere stringhe, numeri e quant’altro.
Just a clarification, about the $ 2 argument, of the printStatement function. In the declaration of the grammar of the PRINT command, that is: PRINT STRING, the parser associates to each TOKEN present, a progressive preceded by the symbol $. In this case $ 1 is associated with PRINT and $ 2 is associated with STRING. This means that when the printStatement function is called, the $ 2 parameter will contain the string passed as an argument to PRINT, and so on, so we could also have a $ 3, a $ 4, and so on. We are talking about parameters, which make up the grammar of the command and which may contain strings, numbers and so on.
Let’s go back to the PRINT command. In this case, and for each command, you will create two files in the “statements” folder, that is printstmt.c and printstmt.h, the first that contains the actual code of the print command and the second is nothing but the header file as the C language provides.
Let’s see what the printstmt.c file contains:
#include <stdio.h>
#include <stdlib.h>
#include "../global.h"
#include <string.h>
#include "printstmt.h"

void printStatement(const char* stringLiteral) {
   printf("%s", stringLiteral);
}
Here we see that, once the grammar is checked, the parser executes this piece of code:
void printStatement(const char* stringLiteral) {
   printf("%s", stringLiteral);
}
And the stringLiteral parameter, contains the content passed by the $ 2 argument. Therefore each command will be composed exactly as PRINT. So the PRINT command does nothing but print on the screen the content on the screen, passed by the STRING token, and associated to $ 2 by the parser, with this instruction: printf (“% s”, stringLiteral);
To you, I leave the task of seeing what has been done for the other commands that you will find described in parser, y, as regards the grammar and, in the relative files contained in the “statements” subfolder, as regards the action associated with each command.
Compilation of the interpreter
the task related to programming the commands and the relative shell is finished, now we have to see our interpreter running and start executing some commands from the shell or script file.
The first necessary operation is to compile our interpreter, not only that, the scanner and the parser must also be generated. Do you remember what was said previously with Flex and Bison?
In this regard I have implemented a make file for both windows and Linux environment. The two files can be found under the root of the project, that is the “language” folder.
So, just run the make.bat file for windows and make.sh for linux from the command prompt or linux terminal respectively. That’s all, the make file will generate an executable called “console.exe”, which you can rename to your liking, which is the interpreter. If you run console.exe without arguments, it opens only the interpreter command prompt and everything you type will be directly interpreted by the on-screen scanner, while if you pass a file, such as the script.prg file, to console.exe, all of it contained within the script will be interpreted by the scanner.
It should be noted that all the other commands, I am talking about: CLEAR, HELP, QUIT, EXIT, DIR, CLS, do not have a corresponding “.c” file in the “statements” folder. This is because it is not always necessary to associate the action of a command in a separate file. But as for these commands, I preferred to associate the action of the command directly within the grammar, that is, in the parser.y file. This technique is recommended when the action to be associated is executable with a few lines of code.
Just for the sake of clarity, I propose the code associated with the DIR command:
dirstmt:
         DIR ARGUMENT {
            if(strlen(prompt) > 0) {
               char *dest;
               char *src;
               strcpy(dest, "dir ");
	   strcpy(src, $2);
	   strcat(dest, src);
	   system(dest);
	}
         }
         | DIR {
            if(strlen(prompt) > 0) system("dir *.*");
         }
  ;
As you can see, this command works only within the shell, this is evident from the fact that the instructions are all inserted inside: if (strlen (prompt)> 0). The command simply executes the “dir *. *” Command if it has no arguments, otherwise it executes DIR with the argument contained within the $ 2 variable. $ 2 could be anything, for example, * .prg, i.e. anything you type from shell. Everything is done through the “system” function of the standard C library, which allows you to launch commands from the operating system.
Note that the command, in the parser.y file, has two variants of the grammar, namely DIR ARGUMENT and DIR. The two grammars are interpreted and associated with the “|” character, that is to say either this grammar: DIR ARGUMENT or this other DIR.
Conclusion
I’ll try to summarize the process of creating another command. So, first you have to modify the lexer.l file, and add, immediately after this instruction: {C} {L} {S} {return CLS; } your command, for example: {M} {Y} {C} {O} {M} {MA} {N} {D} {return MYCOMMAND; }.
Next, you need to edit the parser file, y and, add the following statement right after: | clearstmt, at line 37, the declaration that will identify the statement relating to the MYCOMAND token, namely: | mycomandostmt.
Add, before the “%%” character at the end of the file, a block identical to this:
miocomandostmt:
       MIOCOMANDO {
          // instructions in pure philosophy C
      }
 ;
in case you have decided to make the action corresponding to the grammar of MY COMMAND in a separate .c file, then you have to add two files in the “statements” folder, namely: mycomandostmt.c and mycomandostmt.h, and add after the line gcc -w -c statements / printstmt.c -o statements / printstmt.o, the following statement: gcc -w -c statements / mycomandostmt.c -o statements / mycomandostmt.o, and modify the statement: gcc -w -o console.exe global.o statements / printstmt.o y.tab.o lex.yy.o, like so: gcc -w -o console.exe global.o statements / printstmt.o statements / mycomandostmt.o y.tab .o lex.yy.o leaving the rest unchanged.
The same changes must also be made to the make.sh file, for linux environment, in the same way as what was done in make.bat. At this point you just have to run “make.bat” or “make.sh” in Linux from the command prompt, as shown in the figure:
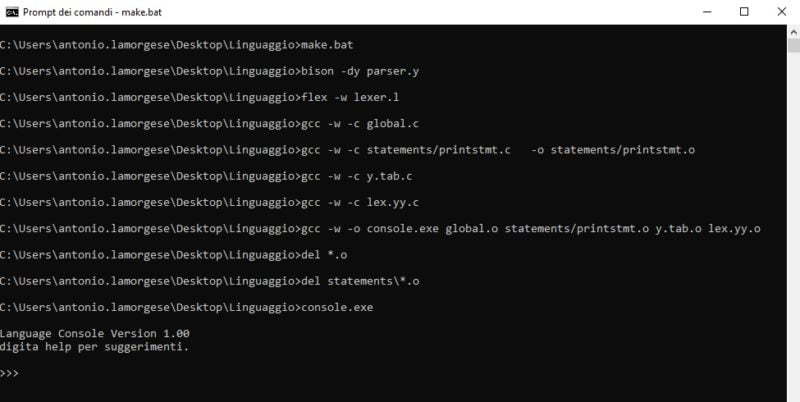
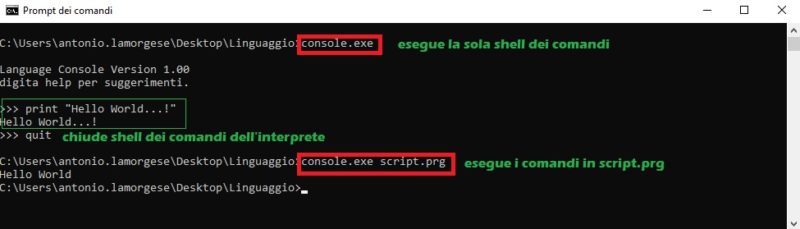
At the end of the execution of the make file, the interpreter will automatically open “by running the file” console.exe “, type your commands directly from the shell, or with console.exe script.prg, you will make the interpreter execute the commands stored in inside the script.prg file, as shown in the figure:
I hope I have been of help and have dispelled all your doubts on a relatively difficult subject.