
How to create an android app step by step
To create a native Android app, which can directly use all the features and functions available on Android smartphones or tablets, it is necessary to use Java but above all some APIs designed exclusively for the Android platform. Therefore it is necessary, even if not at a professional level, to have a good knowledge of Java programming. These APIs are nothing more than Java libraries, that is, a set of files with the jar extension, which allow you to perform common tasks such as: drawing text, shapes and colors on the screen, playing sounds or videos and interacting with the installed hardware sensors on the mobile. Over the years, these Android APIs have evolved so much as to make development in the Android environment more and more stable and intuitive.
As a result, being an Android developer today is easier than ever, even more so if you use Android Studio, the official tool to develop applications with this amazing operating system.
Android Studio is an integrated development environment available for free under the Apache 2.0 license, and owned by Google and JetBrain.
In this tutorial I’ll show you how to create your first Android app with this amazing IDE. While doing so, I’ll also introduce you to important Android-specific concepts like views, layouts, and activities.
To make things less complicated, we’ll start from scratch to create a very simple and user-friendly app. If you prefer to write less code or need to develop your app as quickly as possible, consider using one of the native Android app template containers available today, I’m talking about CodeCanyon.
Codecanyon is a web portal where you can find thousands of low-cost scripts and plugins for your website or app, even starting from just $2.
Using an already developed template, you can have an app ready to publish in hours. However, it is not necessary to use one of the templates offered by CodeCanyon, given that Android Studio already has its own.
Table of contents...
Prerequisites
To correctly follow what is set out in this article, you will need Android Studio, better if you download the latest version, you will find it available here. You also need to install the Java development platform as described above. If it is not available on your computer, download it from this link by clicking on the JDK Download item.
Now, if you are new to Android Studio and Java, please refer to the following video tutorial to see how to install and configure it:
1. Create a new project
First, you’ll need an Android Studio project to start designing, developing, and building your app. Then launch Android Studio and click Create new project in Android Studio button.
On the next screen, choose Add no activity, because we don’t want to use any of the templates offered by Android Studio. Then press Next to continue.

You will now see a form where you can enter details that are important to your app, such as the name. The name is, of course, what your users will see on their phones when they install your app.
You will notice that you also need to give the package name, it is nothing more than a unique identifier for your app on Google Play. You must follow the package naming conventions in Java. For example, if your app name is MyFirstApp and you work for an organization whose website address is example.com, the package name would be, following the conventions mentioned above, “com.example.myfirstapp“. Or simply, “en.name.surname.myfirstapp“.
Next, you need to decide which programming language you want to use for app coding. So for now, select Java and click Finish.

Android Studio will now take a few minutes to build and configure your first Android project.
Read also: The Best Prestashop Hosting Pre-Installed
2. Create an Activity
An activity is one of the most important components of an Android app. It’s what allows you to create and show a user interface. An app can have one or more Activities, each of which allows the user to perform an action. For example, an app that acts as an email client might have three activities: one for user registration, one for logging in, and one for composing an email message.
To keep this tutorial simple, we’ll create an app with just one Actvity. Then, to create the Activity, in Android Studio’s Project panel, right-click the app entry and select New -> Activity -> Empty activity.
In the dialog that opens, type MainActivity as the name of the activity, then select the Launcher Activity option and press Finish.
Checking the checkbox, relating to the Launcher Activity option, is of fundamental importance, this will allow users to open this Activity when starting the Android app. Therefore, an activity, with the Launcher activity option checked, acts as an entry point for your app, i.e. it is the Activity that will start up the app.
3. Create a layout
Each Activity is usually associated with at least one layout. When you created your Activity, in the previous step, you also generated an empty layout associated with it. Just to familiarize yourself with the Layouts, you can take a look at the activity_main.xml file.
The layout of an Activity consists mainly of views and groups of views. A View, or simply View, sometimes referred to as a widget, is a single user interface component called controls. For example, buttons, text fields, labels and progress bars are examples of views. A view group is a component that can act as a container for other views. Usually, view groups are also useful for positioning and setting the size of views at the same time.
ConstraintLayout is one of the groups of views, i.e. it acts as a container for other, more powerful and flexible views available today to create an Android app. By default, this is the root of your Activity’s layout XML file. Its contents look something like this:
<?xml version="1.0" encoding="utf-8"?>

<androidx.constraintlayout.widget.ConstraintLayout

   xmlns:android="https://schemas.android.com/apk/res/android"

   xmlns:app="http://schemas.android.com/apk/res-auto"

   xmlns:tools="http://schemas.android.com/tools"

   android:layout_width="match_parent"

   android:layout_height="match_parent"

   tools:context=".MainActivity">

   <!-- More code here -->

</androidx.constraintlayout.widget.ConstraintLayout>
We will create a simple app, with functions like a watch in this tutorial. In addition to the local time, it will be able to show the current time for two different countries: Italy and Germany.
To allow the user to choose the country they are interested in, our layout will have two Button views, one for Germany and one for Italy. And to actually show the time, our layout will also have a TextClock view.
As a result, add the following code inside the ConstraintLayout:
<TextClock

   android:id="@+id/my_clock"

   android:layout_width="wrap_content"

   android:layout_height="wrap_content"

   app:layout_constraintBottom_toBottomOf="parent"

   app:layout_constraintTop_toTopOf="parent"

   app:layout_constraintLeft_toLeftOf="parent"

   app:layout_constraintRight_toRightOf="parent"

   android:format12Hour="h:mm:ss a"

   android:textSize="32sp"/>

<Button

   android:layout_width="match_parent"

   android:layout_height="wrap_content"

   app:layout_constraintBottom_toBottomOf="parent"

   android:text="Time in Germany"

   android:onClick="onClickGermany"

   android:id="@+id/germany_button"/>

<Button

   android:layout_width="match_parent"

   android:layout_height="wrap_content"

   app:layout_constraintBottom_toTopOf="@id/germany_button"

   android:text="Time in Italy"

   android:onClick="onClickItaly"

   android:id="@+id/italy_button"/>
Note that the layout_width and layout_height properties of each view set the size of the view. Other properties, however, such as layout_constraintBottom_toBottomOf and layout_constraintLeft_toLeftOf are required to position the view. With the code, shown above, the TextClock will be placed in the center of the screen and both buttons will be placed towards the bottom of the screen.
By default, the TextClock only shows the hours and minutes. The format12Hour property allows you to change the display format of the hours. In the above code, its value is set to “h:mm:ss a“. This code informs the TextClock that it should display the hours, minutes, seconds, and also an AM/PM suffix.
Also note that each Button has an onClick property. This property is used to assign click event handlers to buttons.
The handlers have not been implemented yet, or rather we still have to decide what the app should do at the click of a button, but you can ask Android Studio to generate them for you by default from the IDE. To do this, hover over the event handler’s name until you see a red light bulb appear next to it. Then click on the light bulb and select the second option, which is the one with the yellow light bulb.

At this point, you can try pressing Shift-F10 to run the app. If there are no errors in your XML, you should see something like this on your phone or emulator:
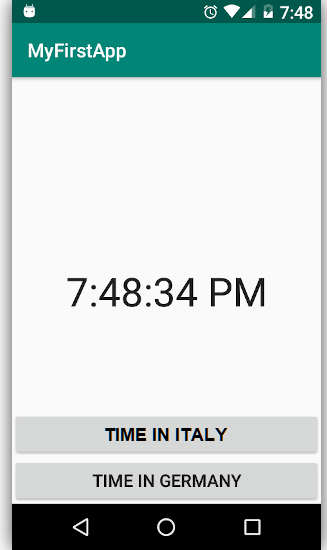
it should be pointed out that Android Studio uses device emulators to run the app, i.e. the developer has the option to choose various devices on which to view the app under development.
Back to us, although the buttons still don’t work, the TextClock should already show the local time, updating regularly every second, just like a normal clock.
4. Implement event handlers
When you generated the event handlers for the two buttons, Android Studio added two methods to your Activity’s Java file, namely in MainActivity.java. If you open this file, you should find the following code inside:
public void onClickGermany(View view) {

}

public void onClickItaly(View view) {

}
Inside the two event handlers, all we have to do is change the time zone of the TextClock. But how do you reference a view in the layout XML file from within the Java file? Well, you can use findViewById() method.
Just by analogy, if you’ve already had experience with Javascript, that’s exactly what a developer does with a very similar Javascript method, to reach the properties of an element contained in an html page.
Back to the findViewById method, once you’ve got a reference to the TextClock, you can call the setTimeZone() method to change its timezone. Then add the following code inside the onClickGermany() event:
TextClock clock = findViewById(R.id.my_clock);
clock.setTimeZone("Europe/Berlin");
Similarly, add the following code inside the onClickItaly() event:
TextClock clock = findViewById(R.id.my_clock);
clock.setTimeZone("Europe/Italy");
If you’re wondering what R is, well done, it’s nothing more than an automatically generated class, during the compilation of the app by Android Studio, and which contains, among other things, the IDs of all the views present in your layouts. The findViewById() method expects you to use this class to pass it a valid ID.
At this point, you can press Shift-F10 again to re-run the app. You should now be able to click the buttons to change the time zone of your watch.
In addition to modifying the code of your first app, you can also try dragging views directly onto an Activity and see what the system has written for you inside the previously managed xml file. Therefore the views can be either positioned by hand by directly typing the code inside the xml file or dragged, with the typical drag & drop, directly onto the Activity displayed at that moment on Android Studio.
Therefore, each Activity consists of an xml file, which manages its graphic display, and a file with the java extension, which implements its actions and contains the code that must be executed for each event of a view.
This type of approach is very similar to the one used by many development frameworks, such as Visual Studio.
Conclusion
You’ve just created your first fully functional native app for Android. I advise you, if you feel like it, to make some changes. For example, you might try using other formats or time zones. You can also try changing the button positions and the display of the clock itself.
There are dozens of views and groups of views that you can use to build your apps. Refer to the official documentation to know them all.