How to Create web app with Python and Flask
Creating web app, especially if you are a beginner with programming, always requires a good knowledge of the languages used and of the development methodologies that connect the client-side world and the server-side world. If you have already developed web applications in the past, for example with PHP, you will certainly have noticed that you need a web server and a database server external to the application to be created. That is, we are talking about third-party applications that must be installed and managed separately.
In case you decide to create a website with Python and Flask, know that both the web server and the database server are applications already included in the web application you are about to create and do not require external configuration or management.
Those who approach Python for the first time have the impression that it is only a scripting language for the execution of procedures to be tested on the fly. In reality, Python is a language that lends itself very well to a countless type of applications, including the creation of websites.
Table of contents...
1. Why build a website with Python and Flask
Creating a website with Python is very simple thanks to the use of ad hoc frameworks, among these frameworks Django and Flask are of great importance. Both frameworks make Python an attractive language in the world of professional web development and in the creation of opensource management software, as these frameworks are free and open to use.
To build a website with Python, I decided to use the Flask library. This is because unlike Django, Flask is a framework that supports APIs and has the ability to interact with a wide range of databases. Suffice it to say that it is currently used by companies of the caliber of Netflix, moreover, social webs like reddit are written and managed entirely in Flask.
Through Flask it is possible to create entire websites using only and exclusively Python code without the aid of web servers and complex data management systems such as MySQL and SQL Server. In fact, Flask incorporates a powerful web server and database engine, widely used for both mobile applications and small and medium-sized web applications. The database used is SQLite, also serverless, basically a web application written with Python and Flask has the web server and the SQLite database server that are part of the application itself.
Now you will see, step by step, how to build a website with Python and Flask. To create this website you will only need an internet connection and a text editor. As always, I recommend Visual Studio Code.
READ MORE: The best way to Query SQL SERVER.
2. Install the Flask module
As I mentioned earlier Flask is a web framework for Python. Furthermore, it is a library that provides a set of classes and functions specially designed to build websites in a very short time.
Like any module and library for Python, it is necessary to install the entire library through the pip3 command, to be run within the command console, for Windows environment, or from the terminal, for Linux or MacOS operating systems. Then, open the terminal and type the command pip3 install flask
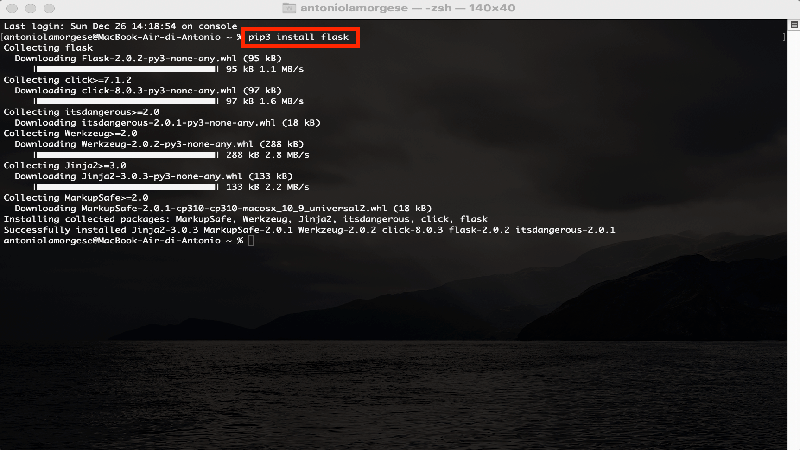
After a few moments, the installation of the Flask module will be completed. From now on, we can import Flask into any Python script and set the entire framework in motion to build interactive websites.
3. Build your first web app with Python and Flask
To create your first website with Python and Flask you need to create a folder where your web project will come to life. So, as a first step create a folder on your desktop, call it flask-app but consider that you can give it a name of your own.
Now, open Visual Studio Code, or if you prefer another text editor, and create a file called app.py. Why app.py? Well the app.py file is the file that Flask looks for by default within the web project folder and which is considered the starting point for the entire website. I don’t know if you’ve ever heard of controllers and MVC applications, here, app.py is your controller.
Now, type in the file, app.py, these instructions in pure Python code:
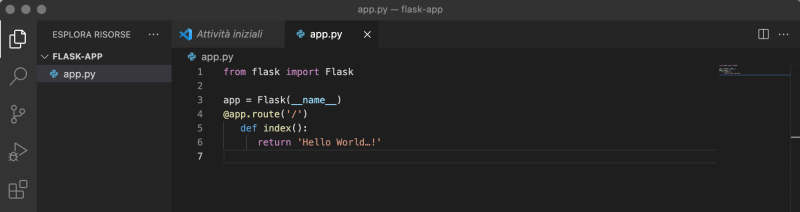
From the code you can see some very interesting instructions. The first line of code allows you to import the flask class from the library of the same name. The second line of code instantiates the Flask object that will govern the entire life cycle of your web app.
Things start to get more interesting from the third line onwards, that is, from the @ app.route (‘/’) line. This line inserted before a function, in this case the function index (), defines the default route, which when intercepted, will invoke index () and process the instructions declared inside it, that is, return ‘Hello World …!’.
4. Start the Flask server and run the Python script
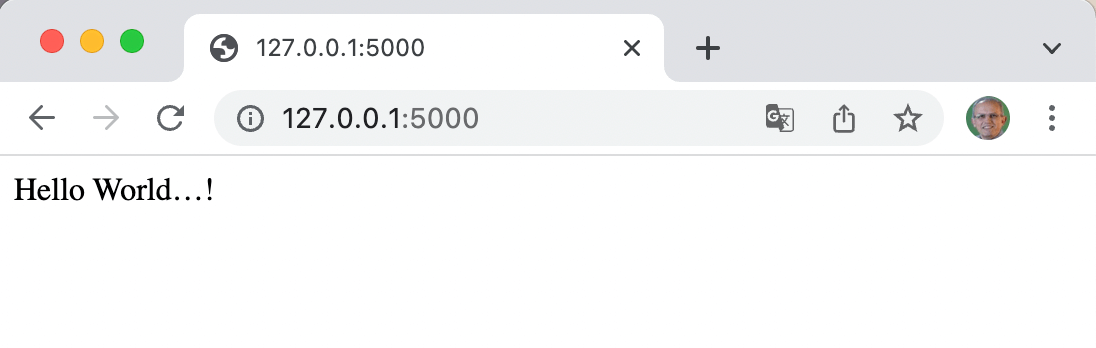
At this point you can already test if your first website written in Python and Flask works. Then, open your terminal and navigate to the path of the flask-app folder, which contains the entire web project. At this point all you have to do is start the web server by typing the command flask run.
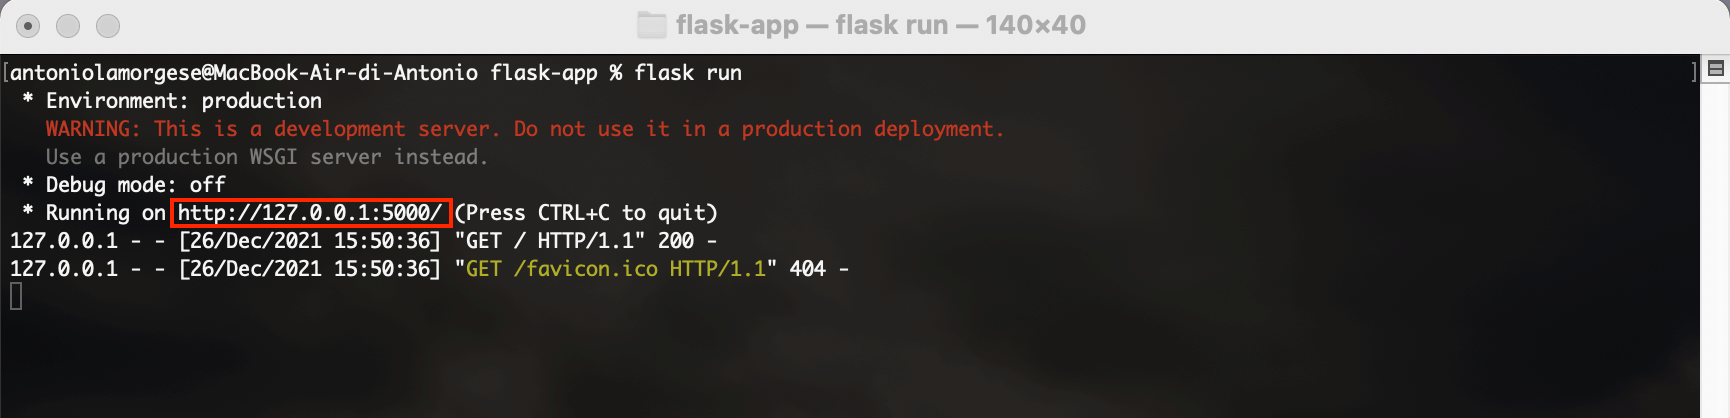
Ok, the Flask web server is started successfully. As if by magic, Flask also gives you the URL related to your web project. Then, type the address provided by the flask run command, highlighted in red in the figure and which identifies the default route, in the address bar of your favorite web browser. Press the ENTER key and you will see the processing of the function index () displayed in the active browser window.
READ MORE: Web app development with WordPress, PHP and CodeLess Framework.
5. Invoke html files with Flask and execute Python code
Now, suppose you wanted to recall an html file, perhaps downloaded from the many websites that allow the free download of files ready to be inserted into your web project. In short, the classic HTML template.
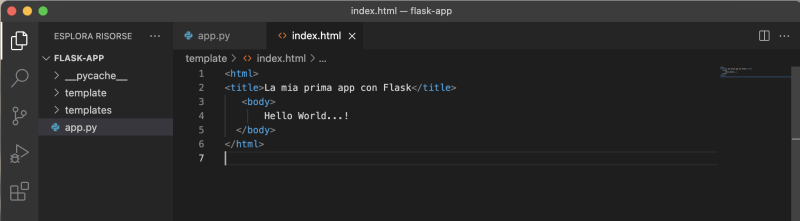
At this point let’s see how to proceed. First, create a folder with the default name templates inside the flask-app folder. Templates is the folder Flask looks for by default to load and render your HTML templates. Then, within the templates folder you will create your HTML pages, the views, which you will recall from the functions contained within the app.py file. By convention, I recommend that you rename the HTML template with the same name as the function that will call it.
Since index () is the name of the function that will call your first HTML template, you will create the index.html file, inside the templates folder, with this content:
Now, to invoke a template from the controller, that is, from the app.py file, you need to modify the contents of the app.py file as follows:
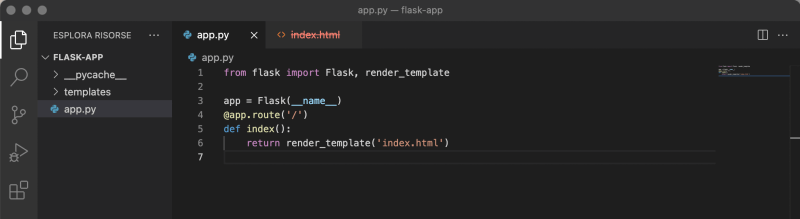
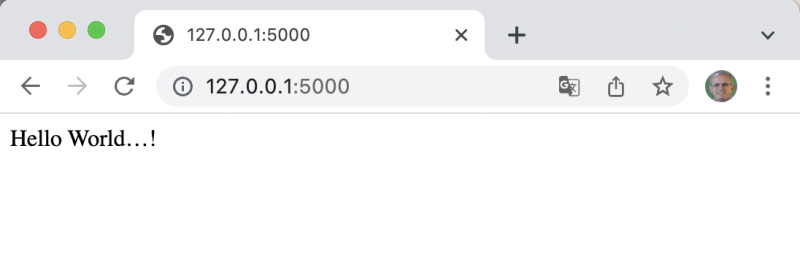
Note that the import of the render_template function has been added to the import clause and that the return command will now return the contents of the index.html page by calling the render_template function. Refresh the web page and you will notice that nothing has changed at the view level but now, flask has displayed the message Hello World ..!, Calling up an html page, that is, a view.
6. Passing data to the html file from a script in Python
Flask, like other web frameworks, is used to create interactive web pages, that is, pages whose content changes based on information contained in Python objects or variables.
It is not uncommon to be in a position to create an app.py controller function that passes entire objects to its template. Therefore, it is necessary to modify the return statement of the index function and add the objects or variables to be passed to the template as additional parameters of the render_template function:
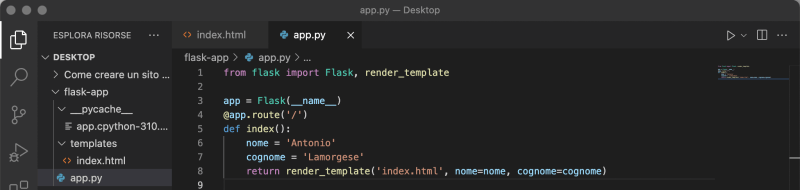
Here too you can see that the two string variables, name and surname, are passed to the render_template function which will forward them to the template. After appropriately modifying the app.py controller, it is also necessary to make changes to the template, that is, to the index.html file. Then, edit the index.html file, contained within the templates folder, as follows:
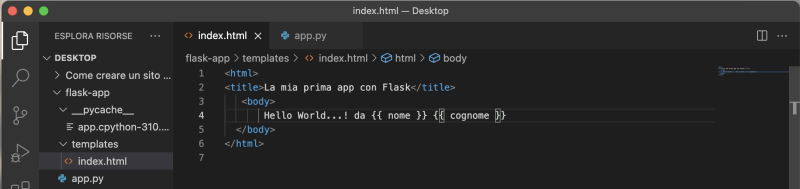
As mentioned previously, index.html has also been changed, this time however, we see the appearance of double curly brackets. This is because all the variables passed from the controller to the template to be interpreted within index.html must be enclosed in double curly brackets. After the modifications of the affected files, update the web page displayed by the browser that will display this screen:
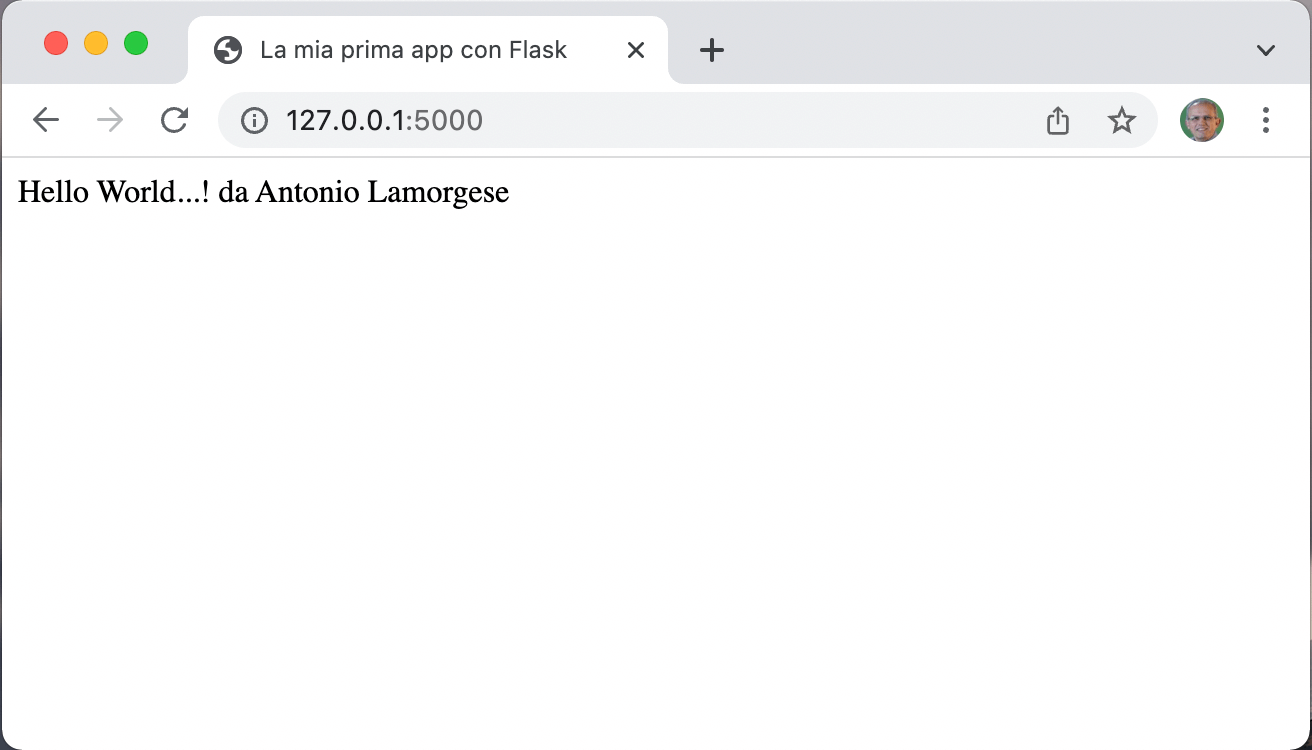
The browser will display the greeting but this time some of the data has been passed to the template by the controller.
7. Access to database with Flask in Python
As in all web app, access to a database is sometimes required to read and store data in tables contained in an SQL database. This time however, there is no need to download and install relational databases such as MySQL and SQL Server. The database managed by Flask by default is SQLite. To use SQLite, in a web project, you only need to import the SQLite library into the app.py controller.
Even if your relational database engine, SQLite, is immediately ready for use, you must first create a database and at least one table to be able to manage it later from Flask. For this reason, you need to create a script containing all database and table generation SQL statements. For the purposes of this guide we will call the database, database.db, and we will call the table, registry. Therefore create the file crea_db.sql, in the same location as the app.py file, and insert the following SQL statements.
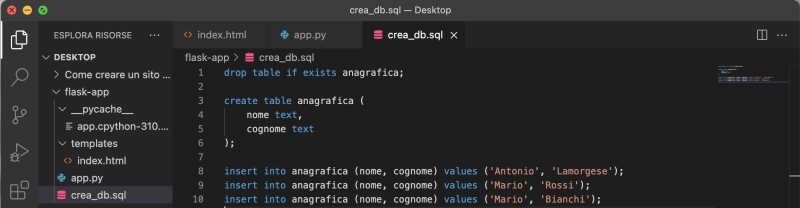
As you can see inside this file, statements in pure SQL code have been inserted, nothing to do with Python. These statements will be executed by SQLite through a properly designed Python script. Then, create another file, still in the same location as the create_db.sql file and rename it to init_db.py like so:

The init_db.py script will create the database and execute the SQL statements contained in the crea_db.sql file. Now, you just have to run the init_db.py script, from the terminal, with this command: python3 init_db.py
Once the init_db.py script has been executed, you will notice the presence of the database.db file inside the flask-app folder. Now, to read the callsigns from the database you have to change the controller, i.e. the app.py file, as follows:
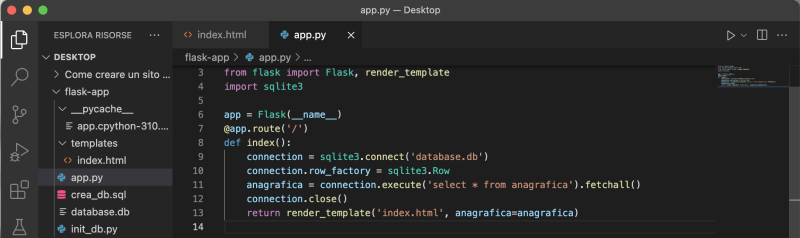
Even if you’re just starting out with programming, you won’t have much trouble interpreting the code inside the app.py controller. In fact, you will be able to locate the Python commands for creating the database, database.db, and the command to invoke the SQL query, “select * from anagrafica”, which will return all three records entered during the initialization phase of the database and the table registry with the init_db.py script. Every time you make a change to the database you will update both the crea_db.sql file and the init_db.py file and you will run the init_db.py script from the terminal.
In addition to the controller to view the contents of the personal data table in the database, database.db, you must also change the template, namely the index.html file, as follows:

Refresh the browser window and the dynamic content will be displayed:
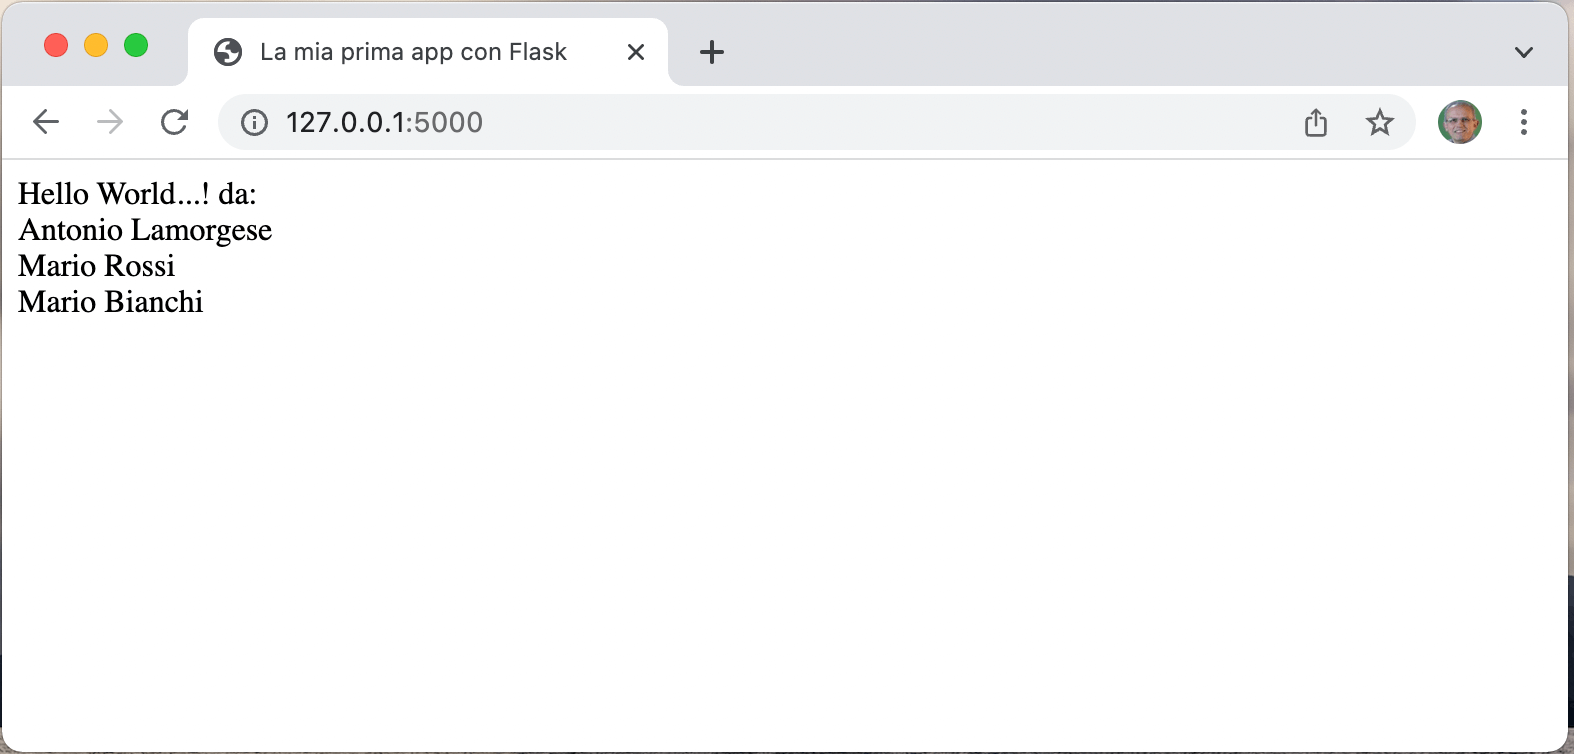
As you have noticed with very few Python instructions and thanks to Flask it is possible to create websites in a very short time. The example proposed in this guide shows only a small part of the potential of Flask. Flask is a very powerful framework that you can learn more by consulting this guide. If you want to know Django, another very powerful and free web framework for Python, you can follow this short video tutorial where you will have the opportunity to learn the techniques used by web development professionals.