
How to create a plugin WordPress
Before we dive into how to create a plugin WordPress i want to say a few words about WordPress. WordPress is an open source content management system (CMS) used to build and manage websites. It includes a simple user interface that allows users to easily create and edit their website content, without the need for coding knowledge. Furthermore, it offers a wide range of plugins and themes to customize the look and functionality of your website. Furthermore, it is used by millions of websites around the world and supports many languages.
What makes it extraordinarily flexible is its plugin system that makes it suitable for any type of web development. Therefore, it is not uncommon to see web applications developed entirely with WordPress. Therefore, to understand how to develop with WordPress it is necessary to know how to create a plugin and, in this guide we will explore the basic steps to create one of your own.
Creating a WordPress plugin may seem like a daunting task, but it’s actually a fairly simple process once you learn the basics and guidelines dictated by the WordPress development team . A WordPress plugin is simply a set of PHP files that extend the functionality of a WordPress site. In this article, I’ll tell you how to create a plugin WordPress step by step.
Table of contents...
1. Choose a name for the plugin
The first step to create a plugin WordPress is picking a name for it. The name must be descriptive and unique, so that users can easily locate it among the myriad of plugins already available on the WordPress Repository. The only requirement that your plugin name must have is that it must never start with the characters “WP_”. Plugins starting with the prefix “WP_” are reserved for the WordPress development team. This is to prevent the code inserted in your plugin from conflicting with the code present in the WordPress CORE.
2. Create a folder for the plugin
Once you have chosen the name for your plugin, you need to create a folder to hold all the files related to the plugin itself. The folder must be created inside the “wp-content/plugins” folder of your WordPress site. The folder name must be the same as the name chosen for the plugin.
3. Create a PHP file for the plugin
Inside the newly created folder, you need to create a new PHP file for the plugin. This file will contain the main plugin code and must be named with the same name as the plugin folder. For example, if the plugin folder name is “my- plugin “, the PHP file should be renamed to: “my- plugin.php”. Now, the “my- plugin.php” file is an empty file. Before inserting any code in this file, it is necessary to include a commented header immediately after the character “<? php” at the start of the file. Now let’s see the structure that the plugin header must have.
Read more: “Web app development with WordPress, PHP and CodeLess Framework”
4. Include a plugin header
As I just told you, at the beginning of the newly created PHP file, it is necessary to include a header comment for the plugin. The header comment, called header of the plugin, will provide WordPress with a whole series of information on the nature of the plugin itself, including: the name, description, version, author and links for further information. This information will be displayed on the WordPress Plugins page and will help users understand what the plugin does, how to install it, and the updates it will undergo over time. an example header for the “my- plugin” plugin is this:
/**
*
* Plugin Name:  my -plugin
* Plugin URI:   http://mysiteweb.it/plugin/my-plugin
* Description:  Enter a short description of what your plugin does.
* Version:      1.0.0
* Author:       your first and last name
* Author URI:   The URL of your website
* Text Domain:  my-plugin
* License:      GPL-3.0
* License URI:  https://www.gnu.org/licenses/gpl-3.0.txt
*/
5. Write the code for the plugin
Once you have completed the above steps, you can start coding the plugin. The code can be written using the functions and classes already present in WordPress CORE. The code must be written to extend the functionality of the CMS to meet the specific needs of the plugin. In essence, a plugin is composed of a series of functions linked to predefined WordPress events and executed using the function add_action ( ). For example, if you want to insert PHP code in the HEAD section of your page or post to print the greeting message “Hello World…!” in the upper right corner of your browser, the code should look like this:
if (! function_exists('my-plugin-function-hello-world')) {
   function my-plugin-function-hello-world() {
      ?>
         <div style="z-index: 9999; position: fixed; right: 0px; top: 10px;">
            <p>Hello World...!</p>
         </div>
      <?php
   }
   add_action ('wp_head','my-plugin-function-hello-world');
}
If you’ve already taken a look at the WordPress developer guidelines, you’ve already taken a huge step forward in writing and creating WordPress plugins. In any case, in the code reported above you can see what are the fundamental rules for development in WordPress. Since WordPress is an environment full of features added by other developers, it is necessary to avoid conflicts between functions, classes and objects. Therefore, you must always check, before declaring a function, that this does not already exist. So the first command line:
if (! function_exists('my-plugin-function-hello-world'))
it serves just that purpose. The “add_action“ function executes the “my-plugin-function-hello-world” function and inserts the code present within it into the HEAD section of all your WordPress pages or posts. As specified by the “wp_head” keyword. A fundamental reminder is now necessary. Did you notice the prefix of the “wp_head” parameter of the “add_action” function ? Well, I think so, almost all actions in WordPress are identified by the prefix “wp _”. That’s why, the development team of the CMS, forces you not to declare, names of plugins, functions and classes within it, with the prefix “wp _”. All this for the sole purpose of avoiding conflicts with all the code already present in the WordPress CORE. If you want to know which actions are present in your theme, I suggest you read this guide.
Read more: “ Hooks in WordPress : User’s Guide ”
6. How to test the created plugin
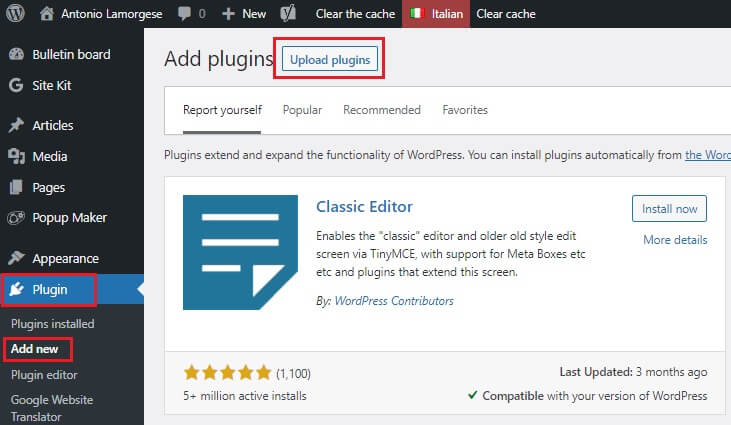
Once the code for the plugin is complete, it’s important to test it to make sure it works properly. To do this, it is convenient to install WordPress locally on your computer and install and test the plugin, which you have just created, without running the risk of damaging your online blog. Since your plugin is not yet present in the WordPress.org repository, to install it you will need to compress the “my- plugin“ folder containing all the plugin files. Access the WordPress dashboard, select the menu item “Plugins > add new“ and click on the “Upload Plugin“ button. Now, click on the “Choose file” button, select the zipped plugin folder and click on the “Install now” button again.
Once the plugin installation procedure is complete, all you have to do is activate it. Now load any of your web page or article and you will see the message “Hello World…!” appear at the top right of the active window of your web browser.
7. Upload your Plugin to WordPress.org for final review
As you can see, becoming a WordPress developer is not that complicated. You’ve built your first plugin and are now excited to publish it on WordPress.org. here things become more puzzling. Of course, in order to make your plugin available to the entire worldwide community of WordPress users, your plugin must be reviewed by the WordPress development team. First, before submitting a plugin for review, make sure it performs a function that can really help blog owners. It goes without saying that our “my- plugin” plugin was developed for educational purposes only.
However, after making sure of the usefulness that your plugin can have for the whole community, to publish it on WordPress.org, you must follow these simple steps:
a. Create an account on WordPress.org if you don’t already have one otherwise click on this link and register as a WordPress developer.
b. Create a plugin repository on GitHub or another source code hosting service, for example, Dropbox. If you have never done it, consult this guide.
c. Fill out a readme.txt file for your plugin, which will describe the plugin ‘s features and instructions for installing and using it. Click here to see an example readme.txt file compiled according to WordPress guidelines . You will need to upload this file into the folder containing all the plugin files to be created. After compiling the readme.txt file you should verify it through the WordPress validation portal. Therefore, click on this link to access the validation operation of the readme.txt file.
d. Submit your plugin for review on WordPress.org using the plugin submission form. The operation is simple. Guess what’? all you have to do is click on this link and upload the compressed folder in zip format as requested in the online form.
e. Now, you just have to wait for the plugin review. The WordPress team developers will verify the plugin, for compliance with the guidelines, and to check for any security issues. Otherwise, the development team will suggest any corrections to be made to the code via email.
f. Once approved, the plugin will be published on the official WordPress repository, will be available for download, and users will be able to leave reviews and ratings.
Read more: “How To Delete Duplicate Files From Your Computer”