Full Stack Developer with Node Js and Express Js
Becoming Full Stack Developer using NodeJs and ExpressJs will project you, with determination, into the world of web development.
di Antonio Lamorgese
Discovering the techniques and, consequently, acquiring the basics to become a Full Stack Developer using two exceptional tools, such as, Node Js and Express Js, will give you the opportunity, as a developer, to access extensive job offers in the development world web and programming.
Discovering the techniques and, consequently, acquiring the basics to become a Full Stack Developer using two exceptional tools, such as, Node Js and Express Js, will give you the opportunity, as a developer, to access extensive job offers in the development world web and programming.
Over the years, in these two sectors, different professional figures have alternated, on the one hand, graphic designers and developers of user interfaces, on the other, developers of API and server-side procedures for accessing databases, or in any case, resources on the side. server.
Today, these two figures can be found in a single professional figure, the Full stack Developer. Becoming a Full Stack Developer using two tools, such as Node Js and Express Js, will project you, with great determination, into the extraordinary world of web development.
Before setting out to understand in detail what a Full Stack Developer does, we need to install, on our computer, those free tools, which will give us the possibility to create those web applications, so requested today, and which take the name of serverless applications.
READ MORE: How to make an Android app without coding
Table of contents...
1. Required software
As I mentioned earlier, there are software to install on your computer, free software and freely downloadable from the internet. Chief among them is the development-oriented text editor, Visual Studio Code. This editor, distributed by Microsoft, is the editor par excellence used by millions of developers around the world.
In addition to Visual Studio Code you need to download two other tools, Node Js and Express Js. Both are free and are now enjoying great popularity and success.
2. Install Visual Studio Code
Visual Studio Code is freely downloadable at this address, where you can choose the correct version for your operating system. Anyway, Visual Studio Code installs itself by running the classic setup.exe, that’s all that’s required. However, it will be useful for you to follow this simple video tutorial, where you will be able to see the extraordinary features of this editor.
3. Install Node Js
Before we talked about serverless applications, that is, web applications that can be run without the aid of a real server. Just to be clear, unlike PHP, which needs a web server to run, such as Apache, serverless applications, on the other hand, are run inside a web server, explicitly declared by the developer in very few lines of code.
Node Js does this magic, it is a framework capable of running javascript on the server side. But that’s not the most interesting feature of Node Js. Its strength lies in the asynchronous execution of code and in the non-blocking event-driven architecture.
Furthermore, Node Js, integrates a library that has transformed this framework into the flagship framework for server-side development. The library in question is Express Js. Later in the guide, you will find out in detail what Express Js is and why it is fundamental in server-side development.
Now, Download and install Node Js, from this web address, or, type node js download in the search bar of your favorite browser, surely the first useful link returned by the search engine will concern the download of node js from its official page. Next, when installing the framework, verify the correct installation by running this simple command from the Windows command prompt:
node -v
In this way Node Js, if installed correctly, will respond by displaying the current version of the framework on the screen.
In the following video tutorial you will be able to see practically what Node.js is, the differences with PHP, and what is meant by synchronous and asynchronous programming.
READ MORE: How to reset the Windows 10 password
4. Install Express Js
After installing Node Js, the installation of Express Js is an even simpler operation than the previous one. At this point, you have to open the command prompt, and create a directory of your choice, we will call it myapp for convenience, which will contain all the scripts of your first web application with Node Js and Express Js. Then type these commands:
After typing and running the mkdir command, also type the following command:
cd myapp
Now, you need to run the npm init command, to create a file, package.json, which will contain some metadata, including, a description of the project, the version of the project, license information and, finally, configuration data. All vital data for our first web application.
Then type and run the following command:
npm init
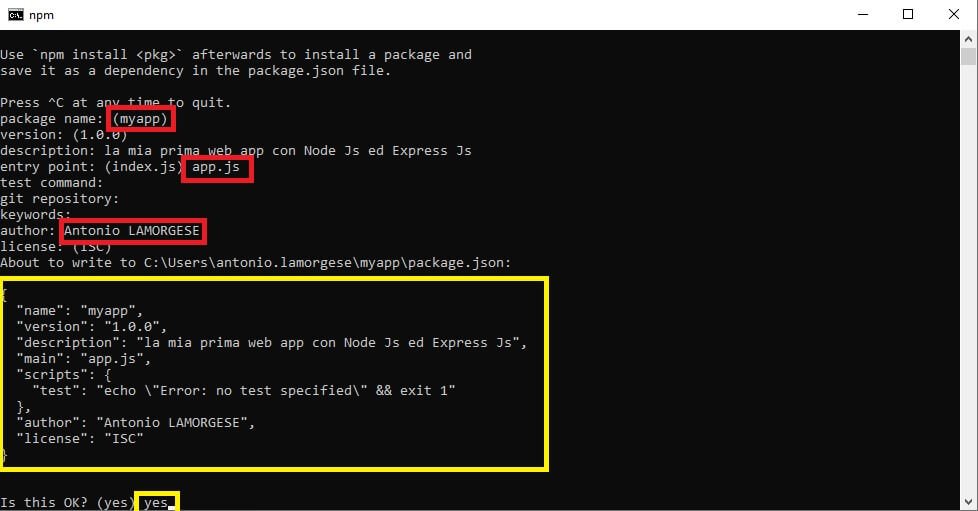
After running the npm init command, the system will ask you to specify all the previously mentioned metadata. As for the entry point, of our web application, that is the file that will be executed first and that will be the startup for the application, by default it corresponds to index.js, you can leave index.js or specify a file with js extension, such as app.js.
Then, continue by specifying the metadata you prefer, press the enter key and continue like this until the end. The package.json file, at the end, will have more or less the content highlighted in yellow, in the following figure:
Quiet we’re almost done. Type this last command, in the command prompt, and you will install express js in your web app. This command will create the structure of the entire application, with all the necessary files.
5. Your first Serverless Web Application
We are now at the heart of the actual development phase. First, open Visual Studio Code, to do this you just type the command code and press enter.
Then, as shown in the figure, click on the Terminal-> New Terminal menu item. This procedure will open the command prompt, directly in Visual Studio Code. Type cd myapp in the terminal.
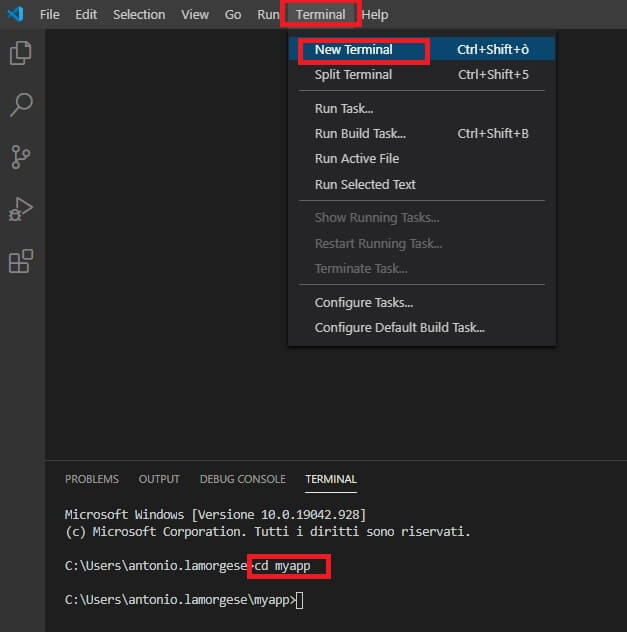
Now, click on the File-> Open Folder menu item and select the myapp folder, which you previously created with the mkdir myapp command. With this procedure you will be able to freely access all the content of myapp and create and modify existing files, such as package.json.
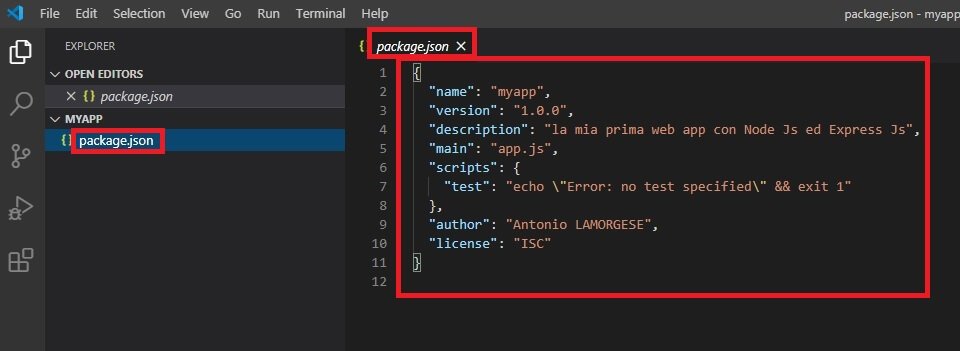
Now, we need to create and modify the content of the app.js file, specified as an entry-point in package.json, remember…?
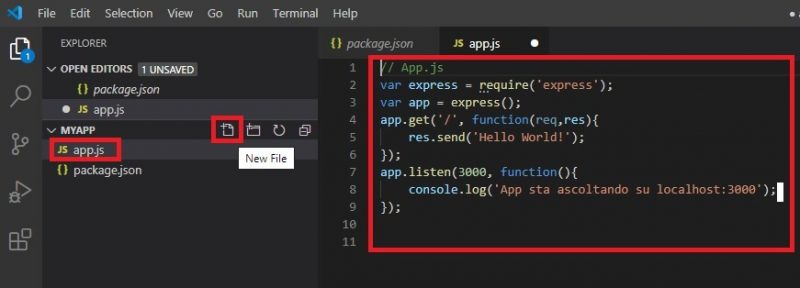
Then, click on the icon depicting a folder with the + symbol and, type app.js. You just created the app.js file, indicated as the entry-point. Copy and paste this code into the editor window, relating to the content of app.js in Visual Studio Code.
// App.js
var express = require('express');
var app = express();

//the default route
app.get('/', function(req,res){
    res.send('Hello World!');
});

app.listen(3000, function(){
    console.log('App is listening on localhost: 3000');
});
6. Run the Web Application Serverless
In the app.js file, in just 6 lines of code, everything an application needs to work has been implemented. The last two lines, in green, implement a web server. As strange as it may seem to you, it is these last lines of code that execute the web application, that is, they act as a web server.
The lines, highlighted in red, contain the instruction to be executed when the default route is detected. That is, when we type the base address in the browser’s address bar, that is, http://localhost: 3000/, the following code is executed:
res.send(‘Hello World’);
Express Js works just like that, that is, the developer will implement routes to which code will be associated to execute when that route is intercepted.
Anyway, to start our web server, just type in the Visual Studio Code terminal, the following command:
node app.js
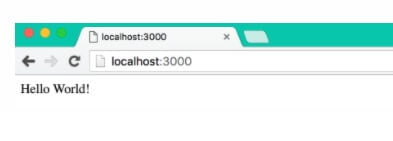
At this point, open the browser and type the following address: http://localhost:3000/ the route corresponding to ‘/’ will be intercepted and the browser will display the following output:
7. The Express Js routing system
In the app.js file, as you may have noticed, the command: app.get (‘/’, function (req, res) intercepts the default route with http request via the get method. As you well know, there are various methods to perform a http request, for example the most invoked methods are: get and post. If we invoke the default route with the post method, the instruction should be changed to: app.post(‘/’, function(req,res).
However, the code app.all (‘/’, function (req, res), would intercept the default route, with any http request method made.
It is possible, again in the app.js file, to indicate other routes, for example, this code intercepts the route for a possible recall of a login page.
app.get('/login', function(req,res){
   res.sendFile(path.join(__dirname + '/login.html'));
});
So when in the address bar of the browser, we type the following URL: http: // localhost: 3000 / login the corresponding code, inserted immediately after the first route in the app.js file, that is, the login web page will be executed. html will be sent to the browser.
I hope this guide has been of help to you, to fully understand a technology that makes a developer unique in the web programming industry. To complete the path followed so far, I suggest you watch this video tutorial on Node and express Js. you will be able to see live everything exposed in this guide.

