How to speed up Google Chrome
In a previous guide of mine, I explained to you “How to speed up a MacBook with CleanMyMac”. Today, however, I will reveal some tricks, which will allow you to speed up Google Chrome, the most used browser in the world, available for every type of device, both computer and mobile, and operating system. The steps that we will see shortly, honestly, I do not know if they can also be done on a mobile phone. In any case, I recommend that you try because what you will see is very simple to implement.
1. Go to Chrome’s “Settings”
Now, let’s start seeing how Google Chrome can be speeded up. Of course, before you go, you need to open Google Chrome. After opening Chrome, you will find three dots at the top right, clicking on these three dots will access the browser settings. Then click on the three dots and then on the item “Settings“.
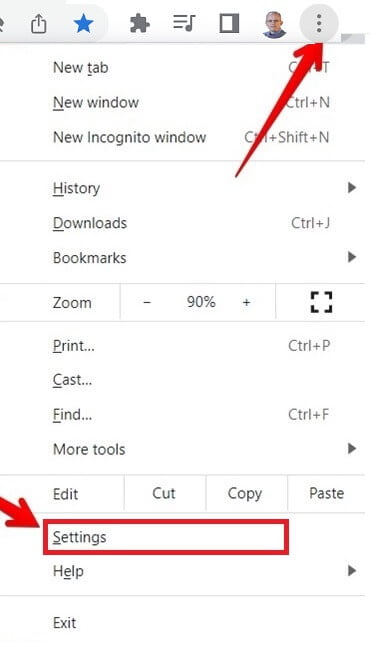
From the settings item you can customize various Chrome features, but what interests us now is access to the “privacy and security” settings.
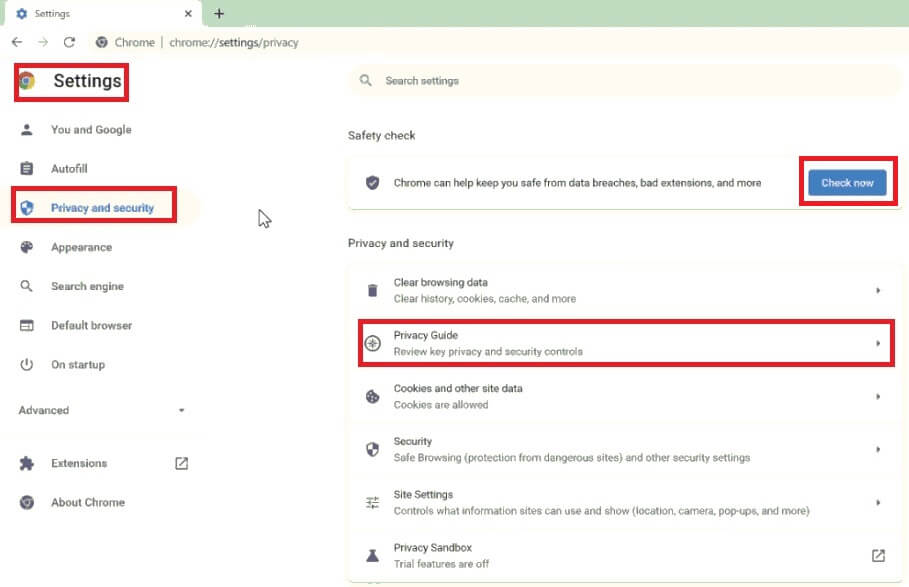
The first thing to do, in Google Chrome, is to click on the “Check now” button. Within a few seconds, Chrome will check a few things, among the many checks carried out, the browser also checks the integrity of the passwords, which it manages, for accessing the various web services for which you have requested to save the passwords. If a blue check appears on all the items listed, after verification, it means that everything is ok, and that therefore, you will have no problems in proceeding to speed up Google Chrome.

In this case, you can see how Chrome highlights problems regarding the integrity of the passwords that it stores with our consent. Some of these passwords are likely not to exceed security constraints. Therefore click on the blue button “Review” and continue by changing the passwords of each web service listed. In any case, before proceeding with the next steps, you need to resolve any kind of conflict.
2. Go to Chrome’s “Privacy and Security”
The next step is to go to the box below which is titled, precisely, “Privacy and security“, then click on “privacy guide” and go on activating, I recommend this step is very important, the item “Make searches and browsing better“.
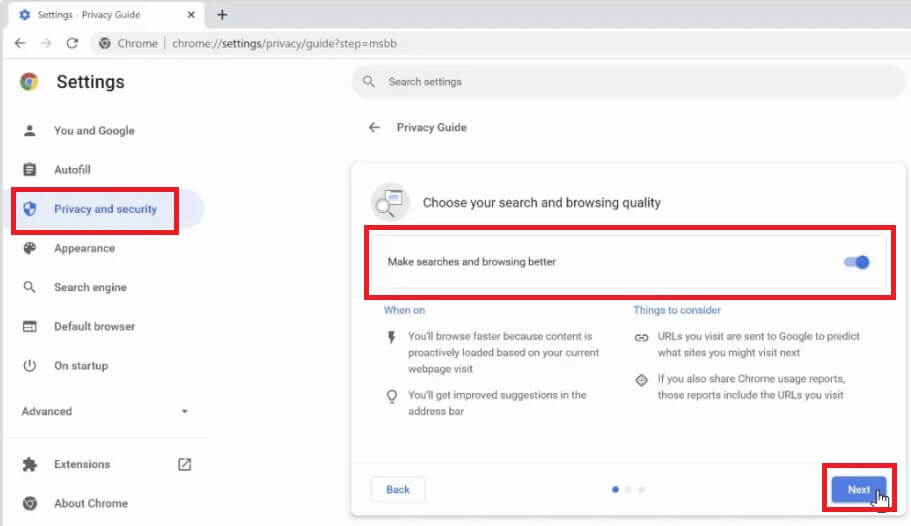
After activating this item, you will immediately notice, by taking a look at the notifications displayed below, what happens following this activation. In fact, this setting makes browsing with Chrome as fast as possible. This is because the contents are loaded proactively, that is, based on the contents of the web page you are visiting, the browser is as if it anticipates many operations that it normally carries out, anticipating the times and therefore improving the browsing speed. Then, click on the “Next” button and then again on the next “Next” button.
Read more: Cloning a hard disk quickly and easily
3. Choose the level of safe browsing protection
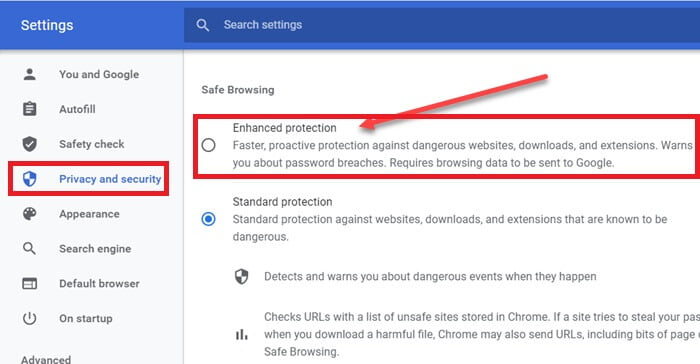
Once this is done, you have arrived at the tab for choosing the level of safe browsing protection. Then, activate the “Enhanced protection” flag and click on the “Next” button again.
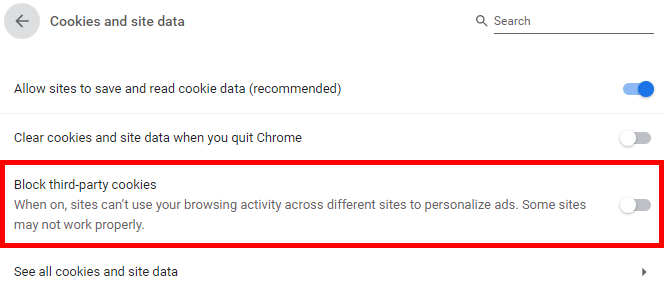
On the “Choose preferences relating to third-party cookies” tab, which concerns the choice of preferences relating to third-party cooks, you will only leave the “Block third-party cookies” active, click on ” Next ” and then on the“ Finish ”button.
4. Advanced System Settings
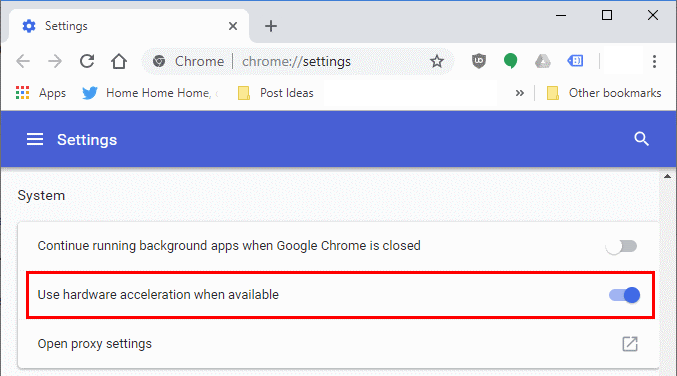
In the next step, again from the “settings” menu, click on “system“, disable the item “Continue running backgrounds apps when Google Chrome is closed “, if present, and also enable the item “Use hardware acceleration when available“.
5. Install the “Monitor & Clean systems CPU/RAM usage” extension
After setting the item discussed in the previous paragraph, I recommend that you download and activate a very useful extension for the Chrome browser. The extension in question is “Monitor & Clean Systems CPU / RAM usage“. This extension frees the RAM, which the operating system makes available to Chrome, avoiding slowdowns in internet browsing.
Installing this extension is very simple, just click on the three dots at the top right, also click on “More tools” and then click on the item “Extensions“. Open the “Chrome web Store” and search for the extension by typing part of the name of the extension to install in the search box. Once identified, click on the “Add To Chrome” button and again on the “Add extension” button.

Once activated, its icon will appear at the top right of the browser window. if this icon does not appear, click on the puzzle-shaped button and unlock the extension by clicking on the padlock icon located to the right of the extension name. At this point, an icon with a circular diagram showing the percentage of memory used will be shown at the top right of Chrome next to all the other icons previously visible.
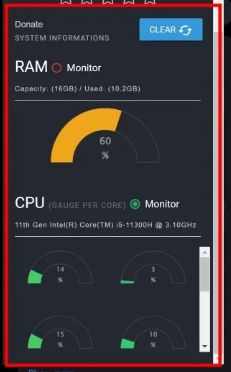
In the event that the memory used exceeds 70%, by clicking on the “Clear” button, you can free up memory for Chrome significantly speeding up Internet browsing. Thanks to this extension you will be able to free not only the RAM but also the CPU by reserving more resources for Chrome. As always, I propose you to follow this video tutorial where you will be able to find out how to speed up google chrome in the best possible way through 6 simple, fast and alternative tips that will change the way you use the browser.


